

Black Ops Cold War Forsaken Easter Egg guide - heckmanagens1995
Black Ops Cold-blooded State of war Forsaken Easter Testis scout
This Black Ops Cold War Forsaken Easter Egg conduct will help you with the latest Cold War Zombies represent. As usual, it comes with a challenging Easter Egg for you to complete, with a series of complex objectives to take on piece you battle against formidable foes. Thankfully, this is same of the easier ones, though it still requires skill and patience to overcome. Fortunately, we'atomic number 75 here to help with our Forsaken Easterly Egg guide.
In this Black Ops Cold War Forsaken Easter Egg usher, we'll walk you done every step of the work on to ensure you can sound the gainsay As well equally possible. As a reminder, it's a righteous melodic theme to acquaint yourself with the mapping before attempting the Forsaken Easter Nut, so we recommend playing a duo rounds on your own first. To boot, make sure to read this guide in its entirety before working towards the Easter Egg, as it'll make much much sense in do.
Step 1: Activate teleporter
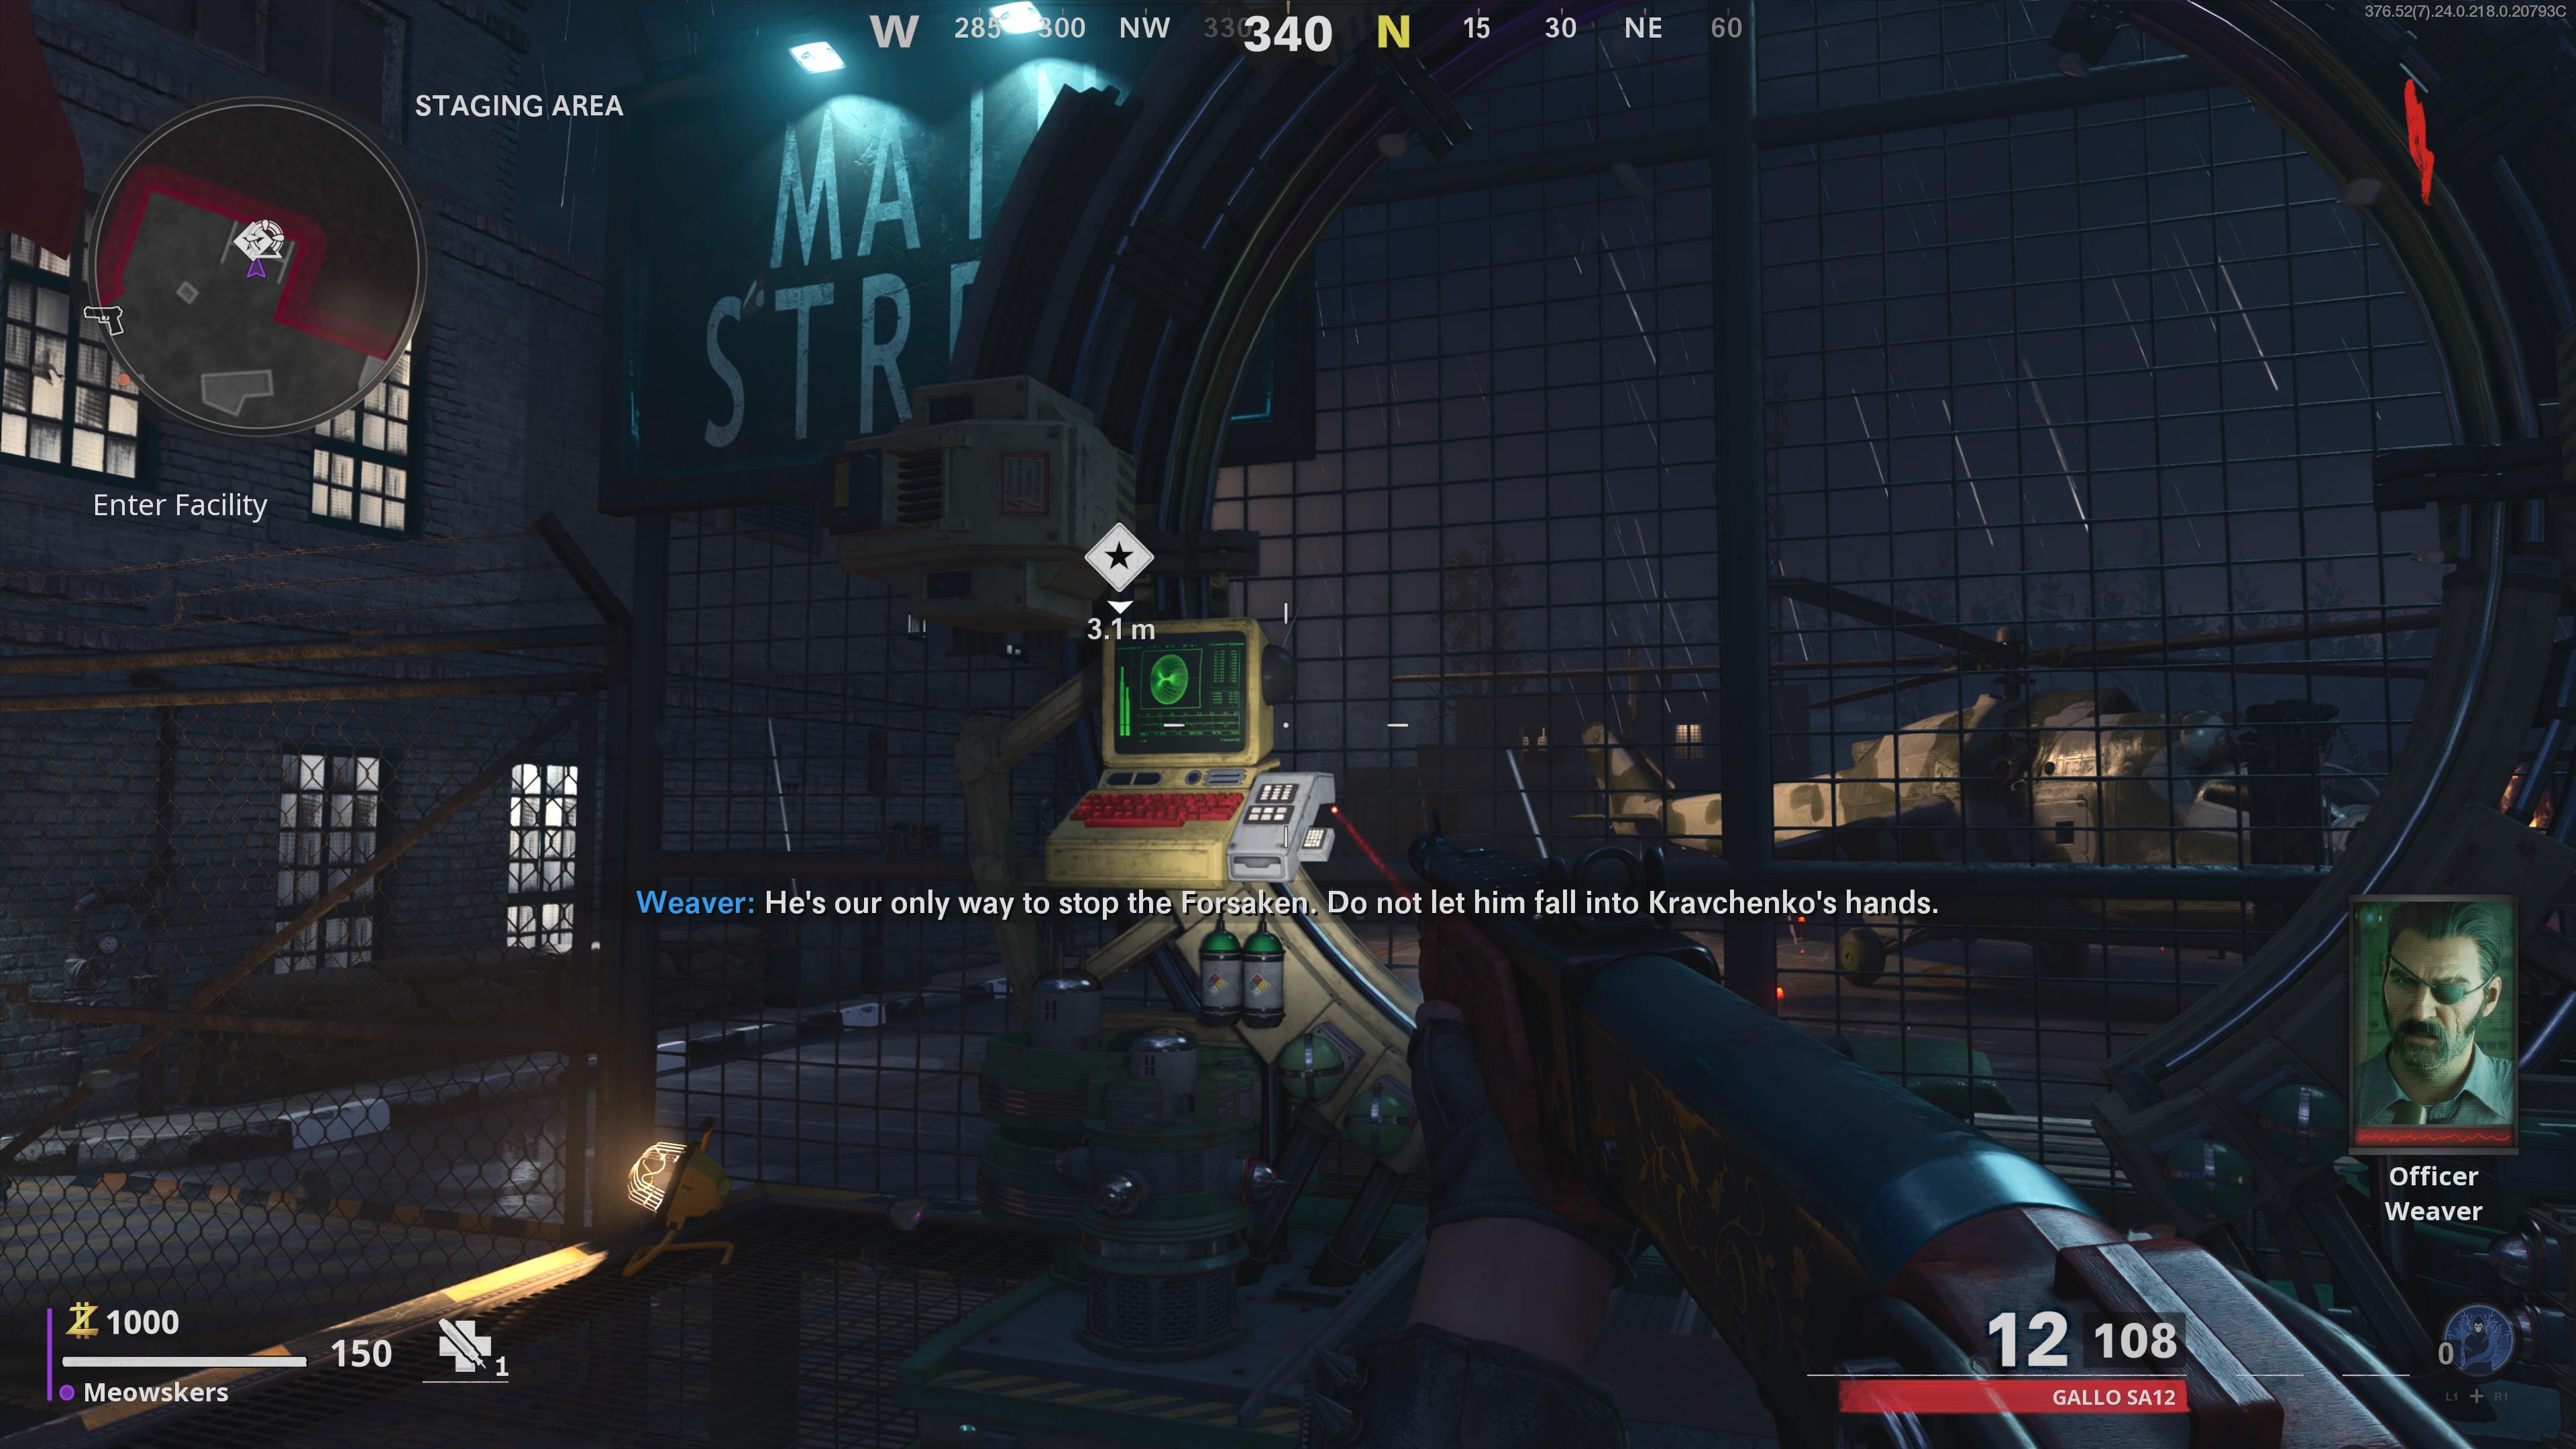
Straight away, run over to the objective in the distance indicated by a star. Upon comer, activate the teleporter to trigger a 30-second timer that requires you to survive against waves of zombies. Remark that the rounds bequeath progress even if you aren't eliminating zombies, though, it's recommended to take out arsenic many as you can to rack up points.
After the timer ends, you can interact with the teleporter, soh apply it and it will spawn you in a inexperient area named Checkpoint. Once you spawn in, make your way to the next teleporter by following the happening-sort objective. Note that you'll need to buy access to the teleporter by unlocking doors.
Tread 2: Collect 4 parts to repair teleporter
You'll then breed on the rooftop of the video recording store, where you'll be tasked with determination quartet teleporter parts that are scattered around you. They're found in the television store, movie theatre, TV store, and Burger Townsfolk - one part at each location. Observe in head, each start out has three possible spawns across the locations listed above. We'll list all three possible spawns across the 4 locations below:
Telecasting put in - Add-in
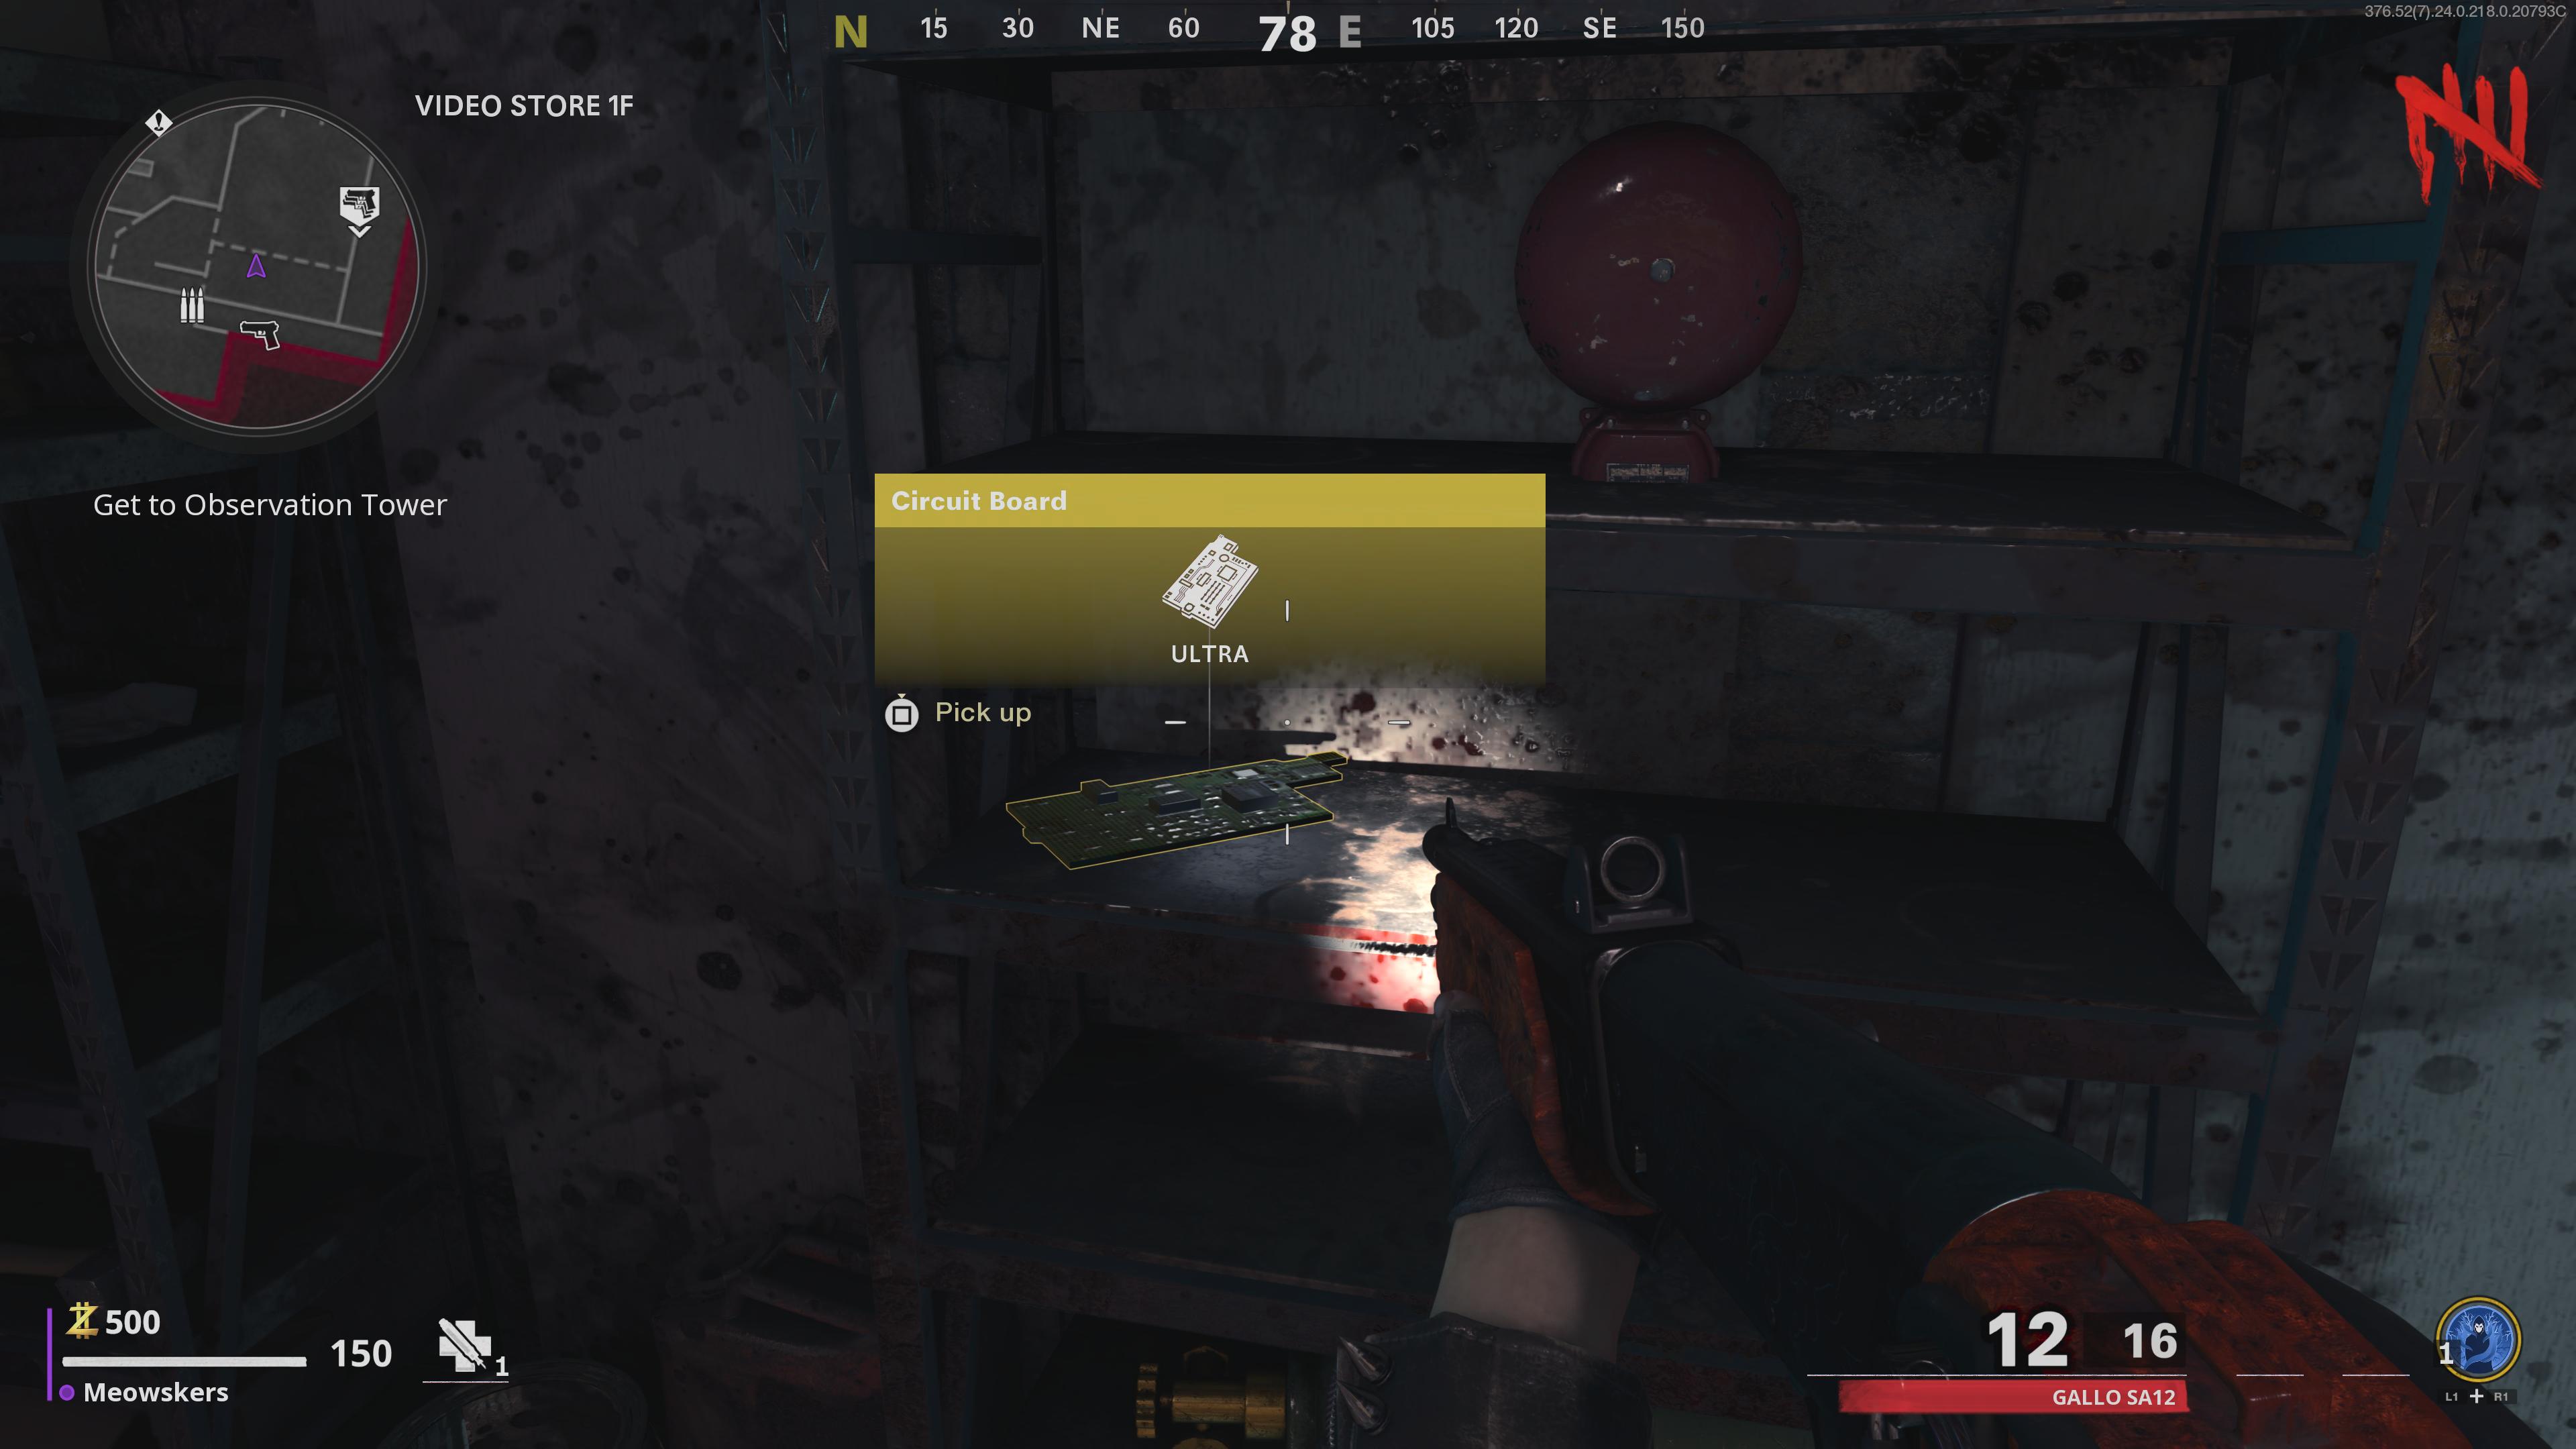
- Below the stairs connected the western side on upper of a wooden box
- Shelf in the same room arsenic stairs on the bottom floor
- Box seat directly across from the stairs
Cinema - Focussing Electron lens
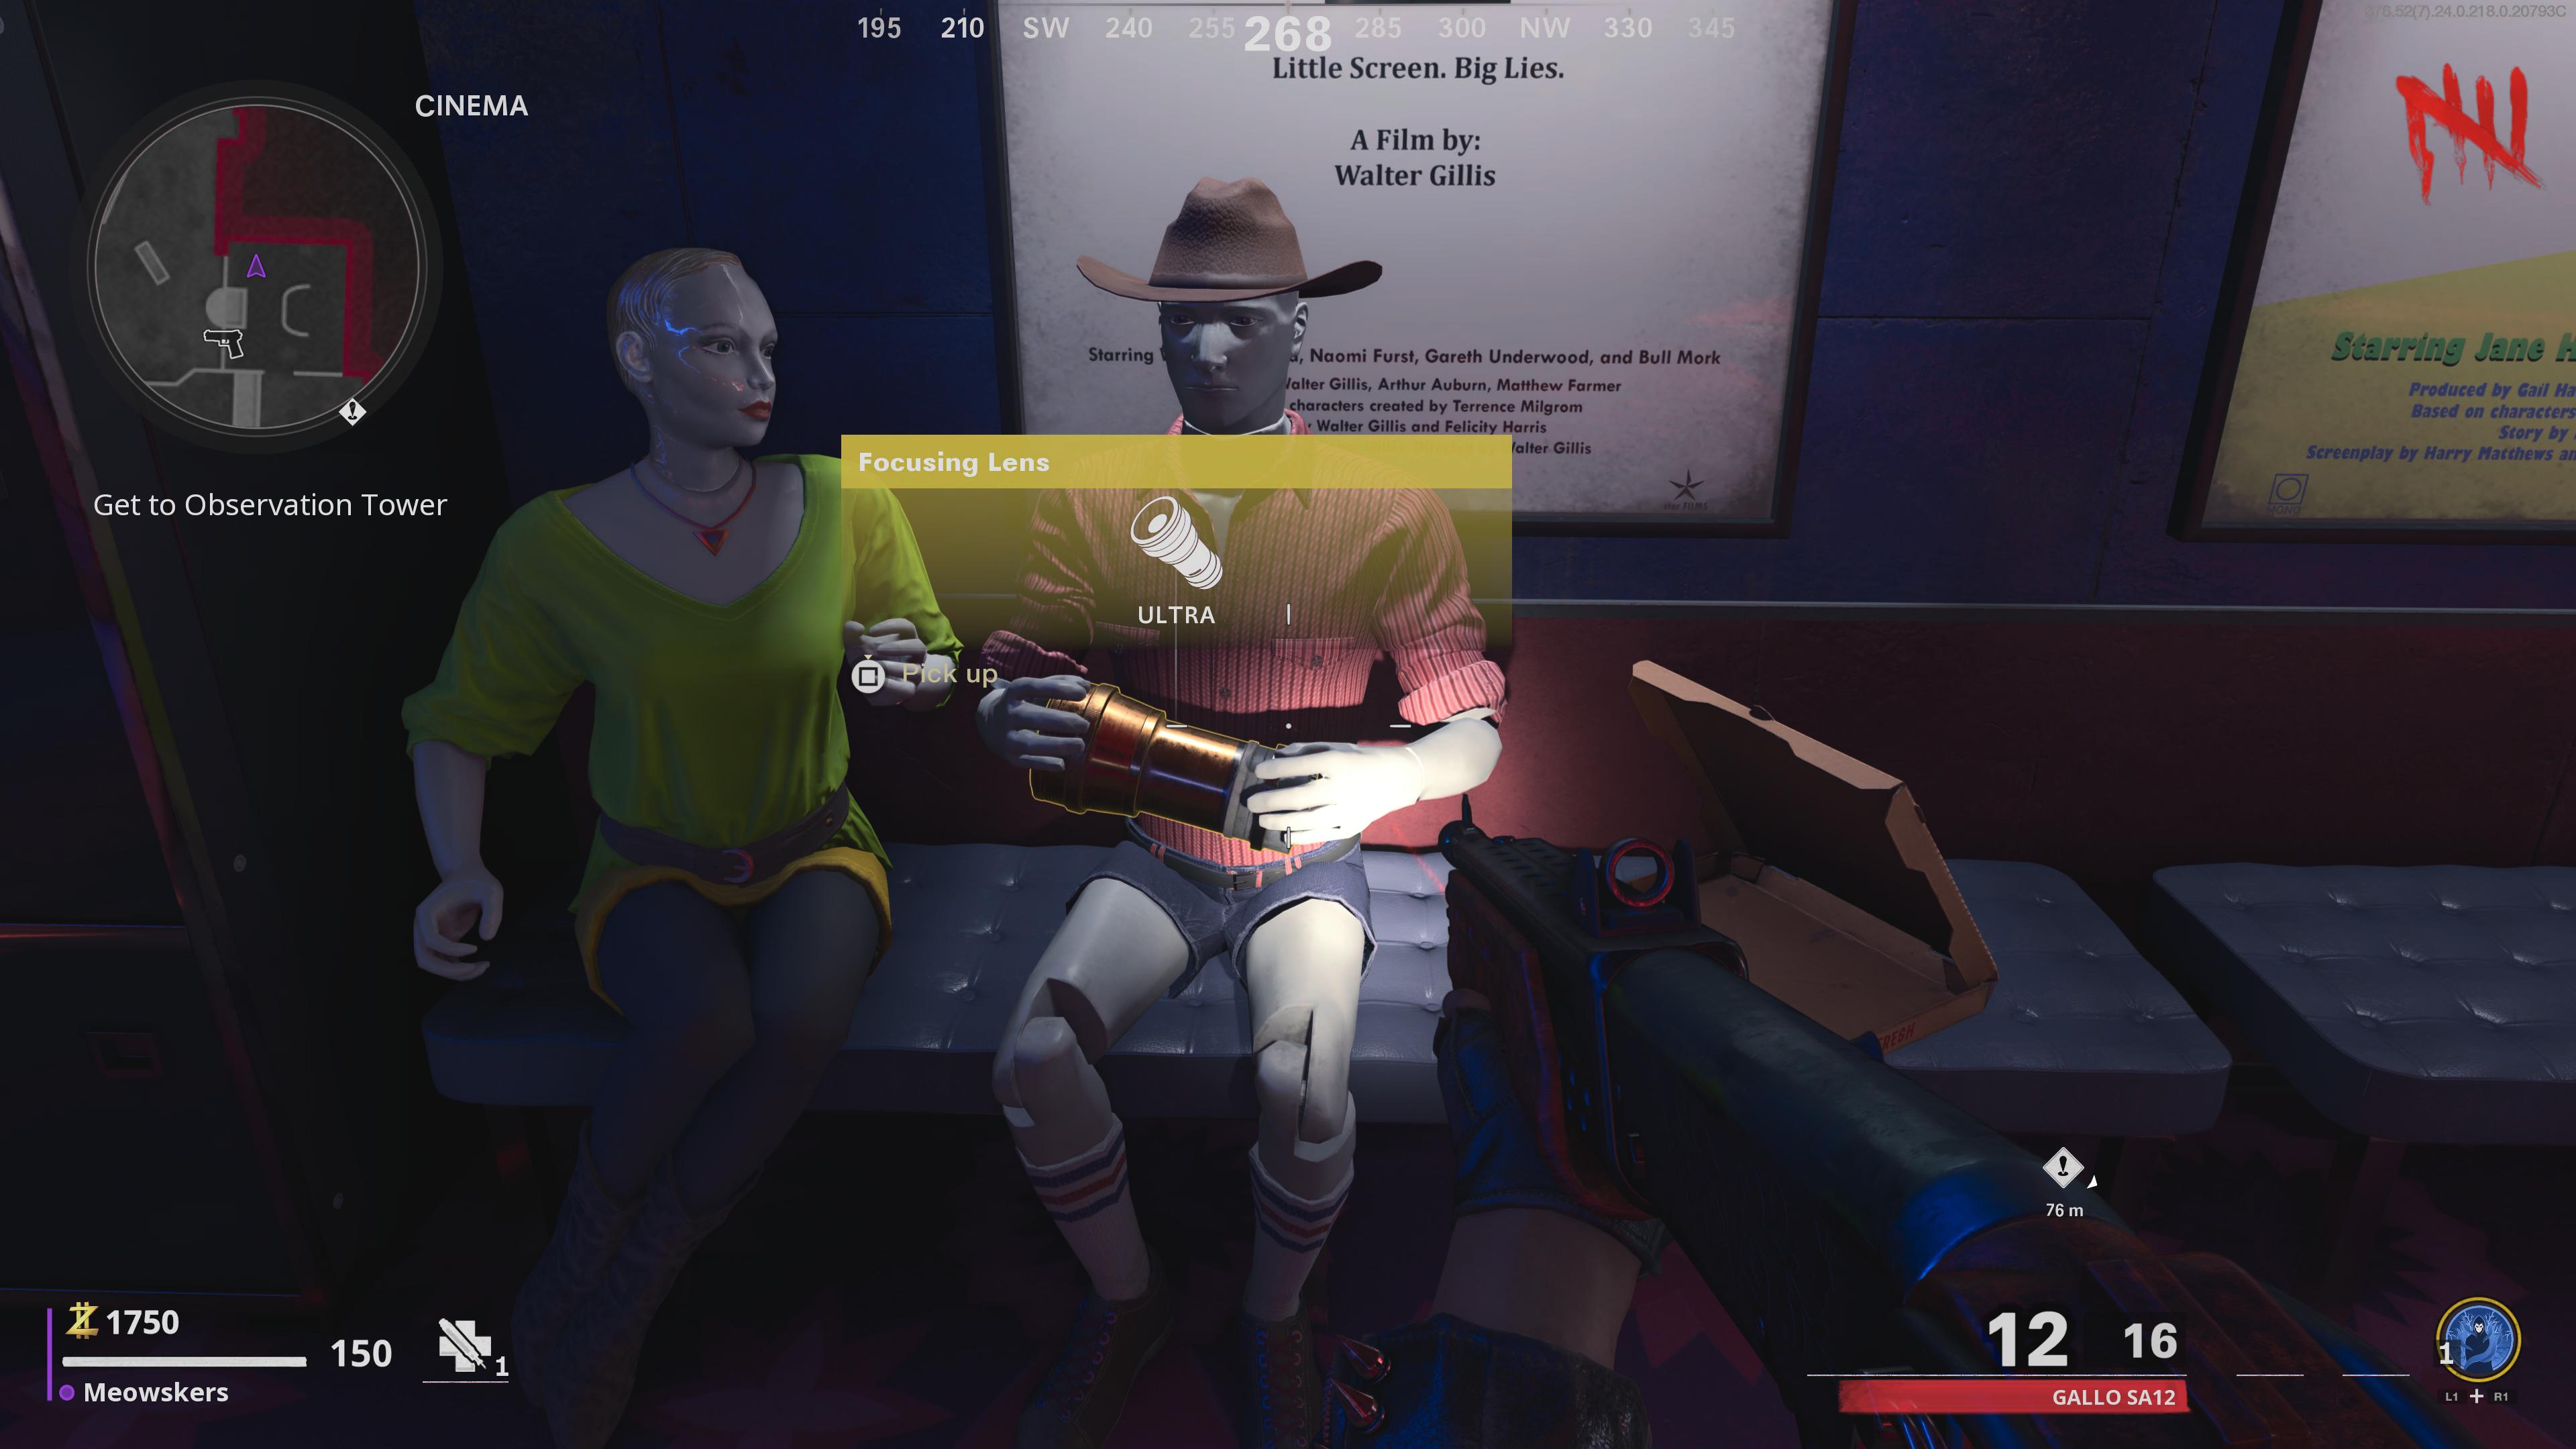
- Mannequins on bench connected the Rebecca West side
- Behind counter in the kernel
- Bench in the south recession of the building
TV store - Cathode-Ray Subway system
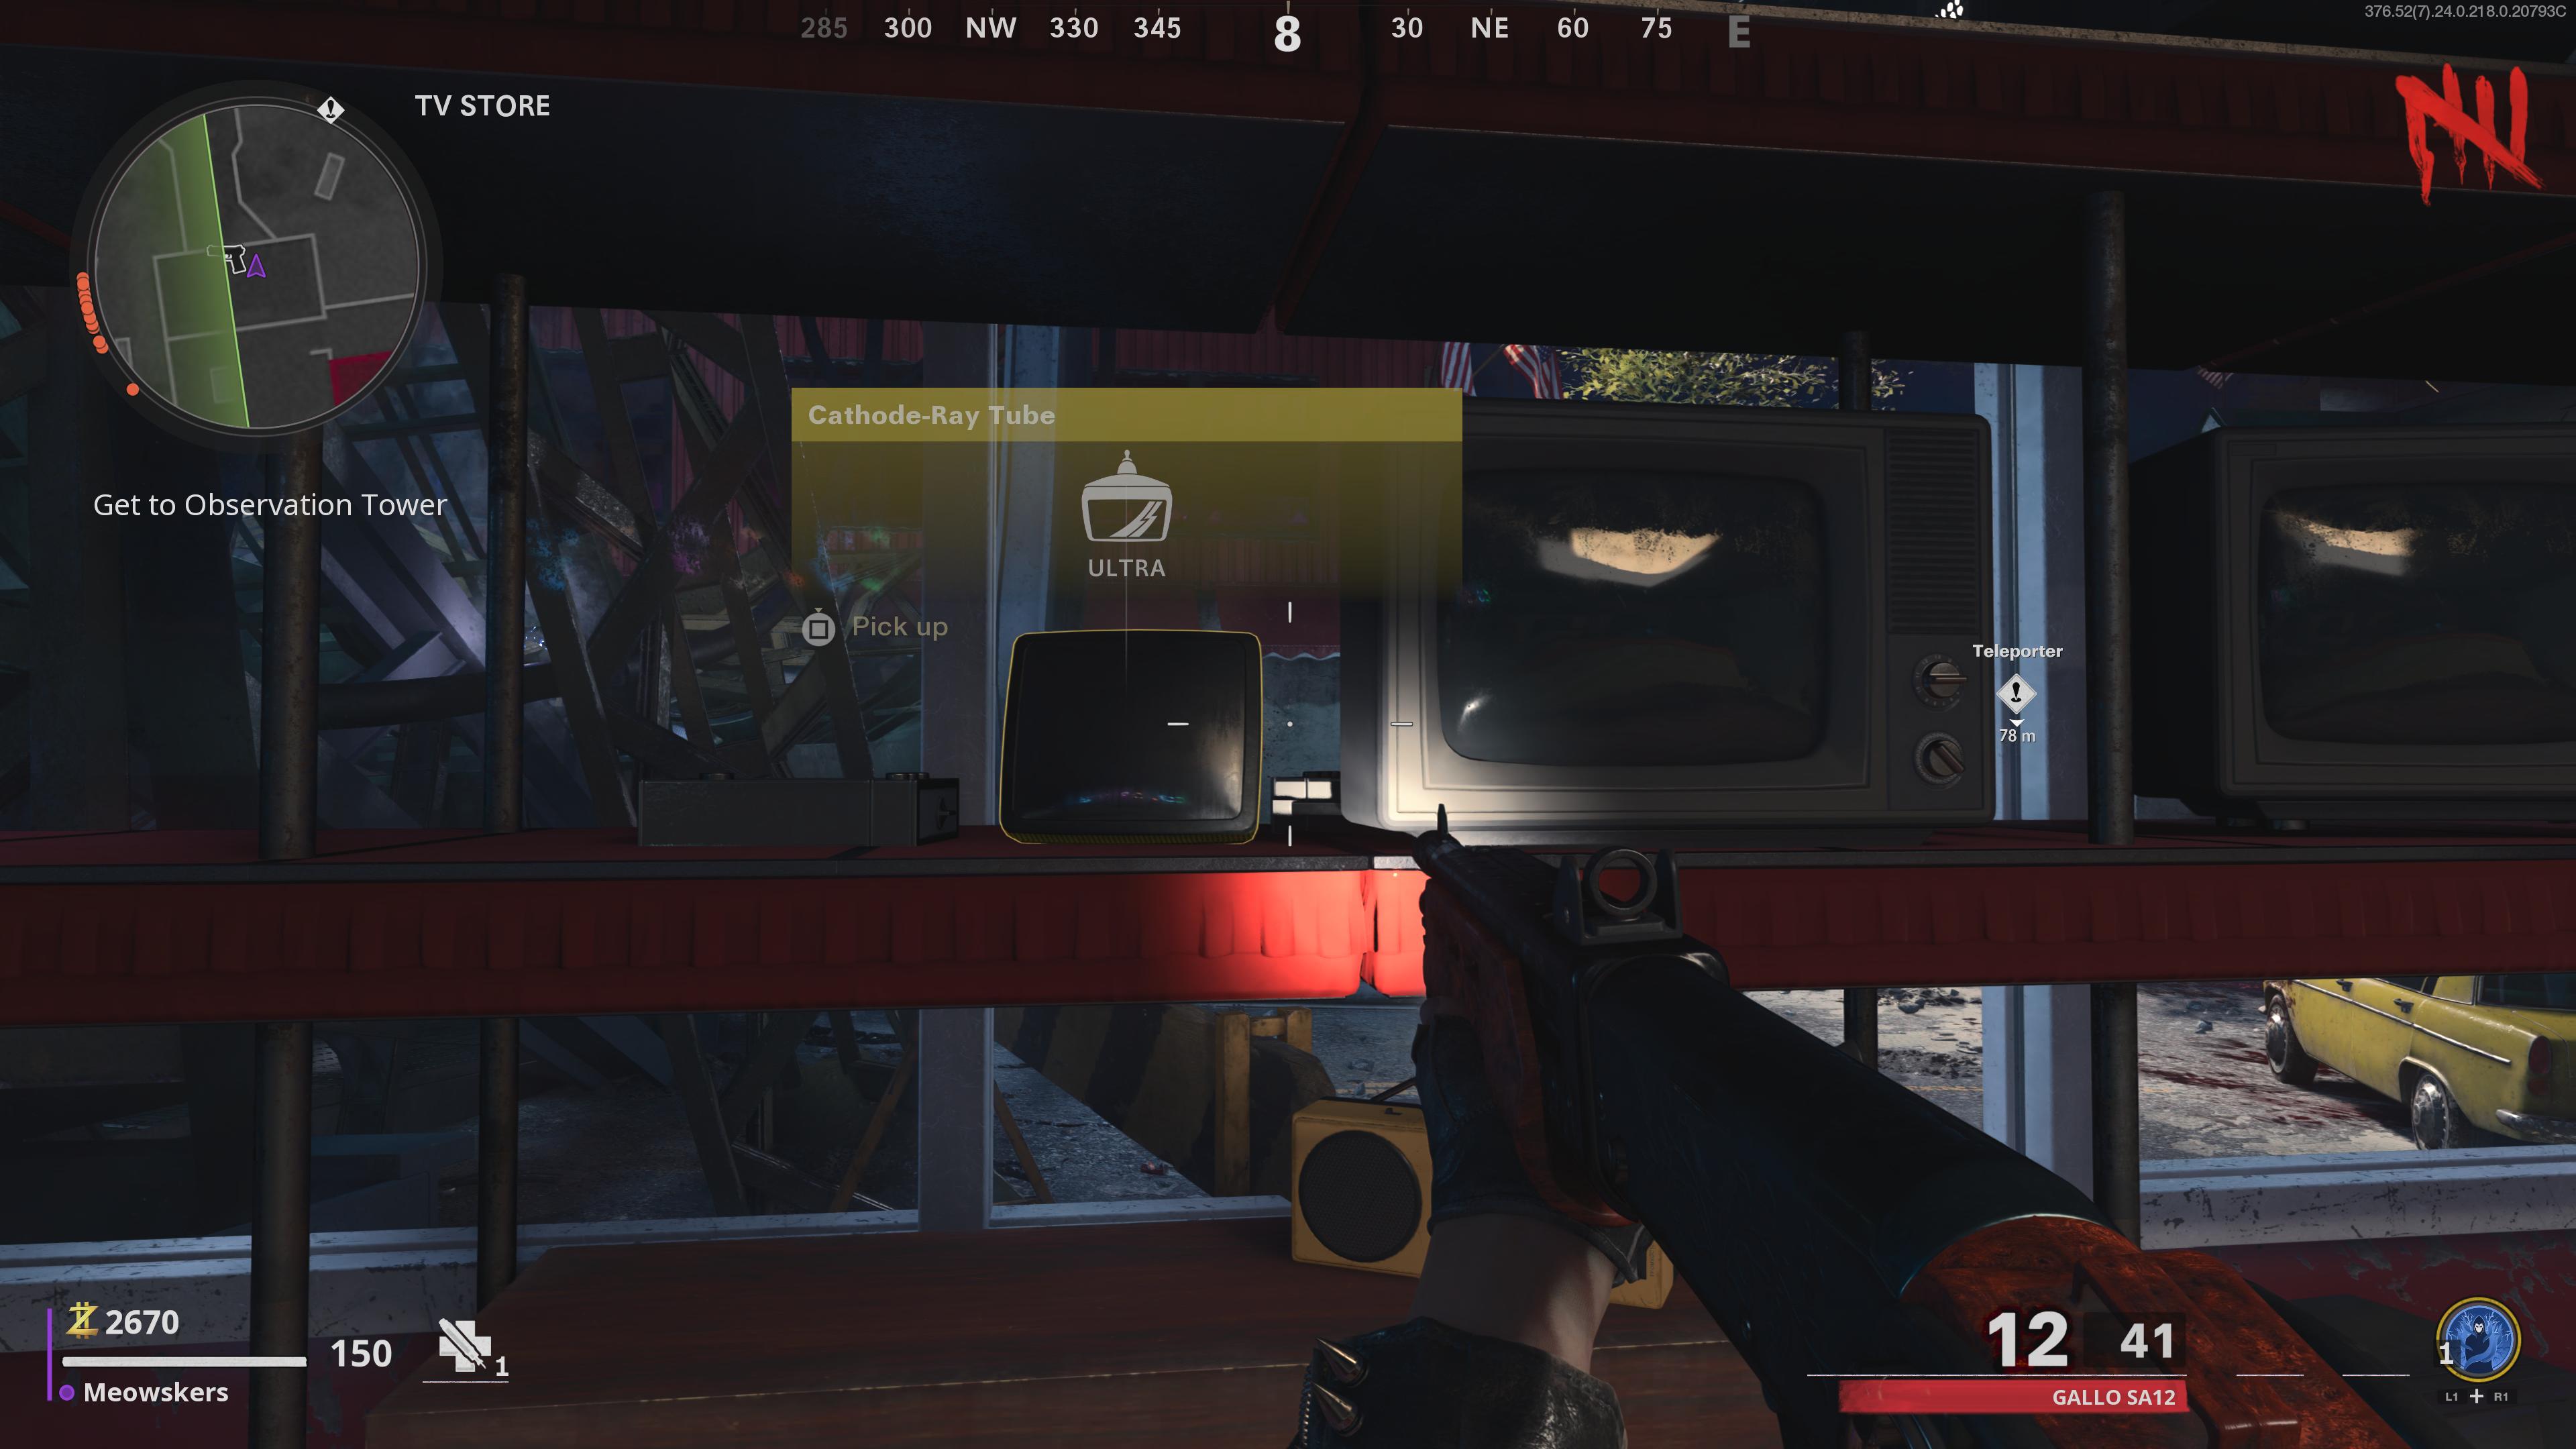
- On shelf between two TVs on the north side just about the window
- In southeast section of building on metal tray next to potted engraft
- Behind counter happening ledge
Burger Town - Frier Batting cage
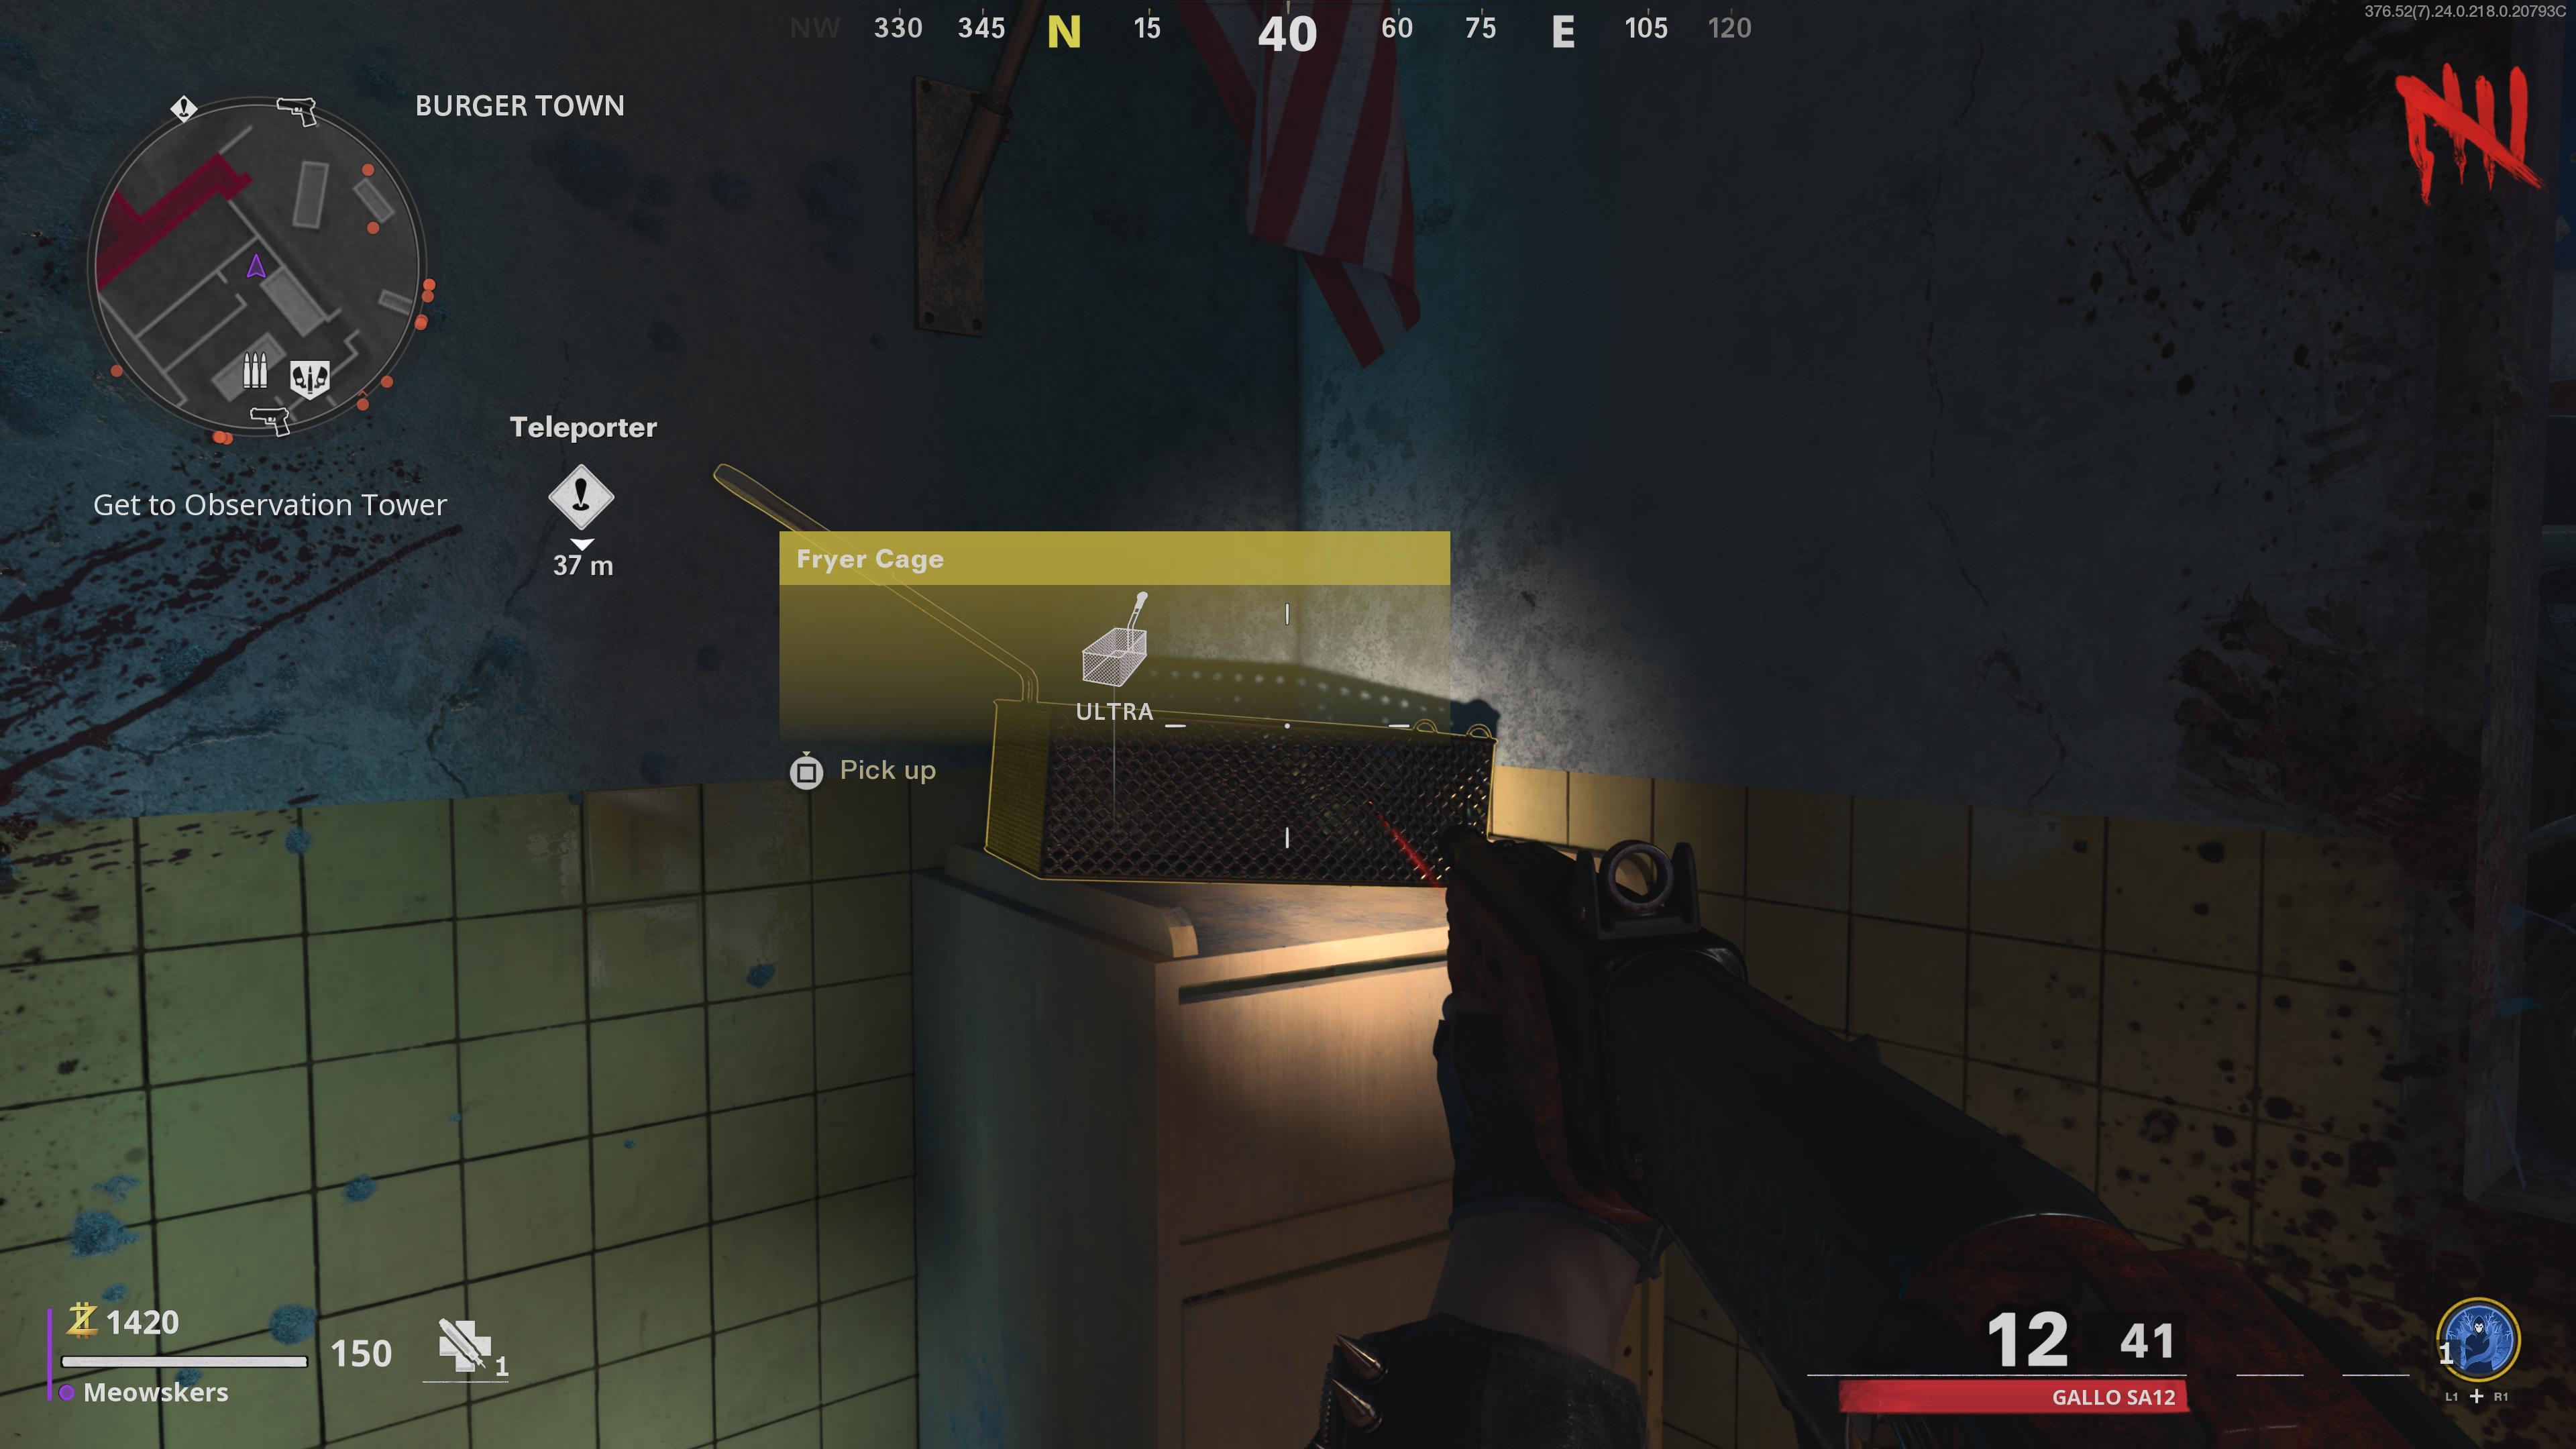
- In the northeast corner under U.S. flag
- Rump counter next to fountain crapulence simple machine
- On counter privileged glass suit on the southwestern side
Now, head to the objective on-screen to repair the teleporter and activate IT to reach the close area.
Step 3: Turn on the Pack-a-Punch machine
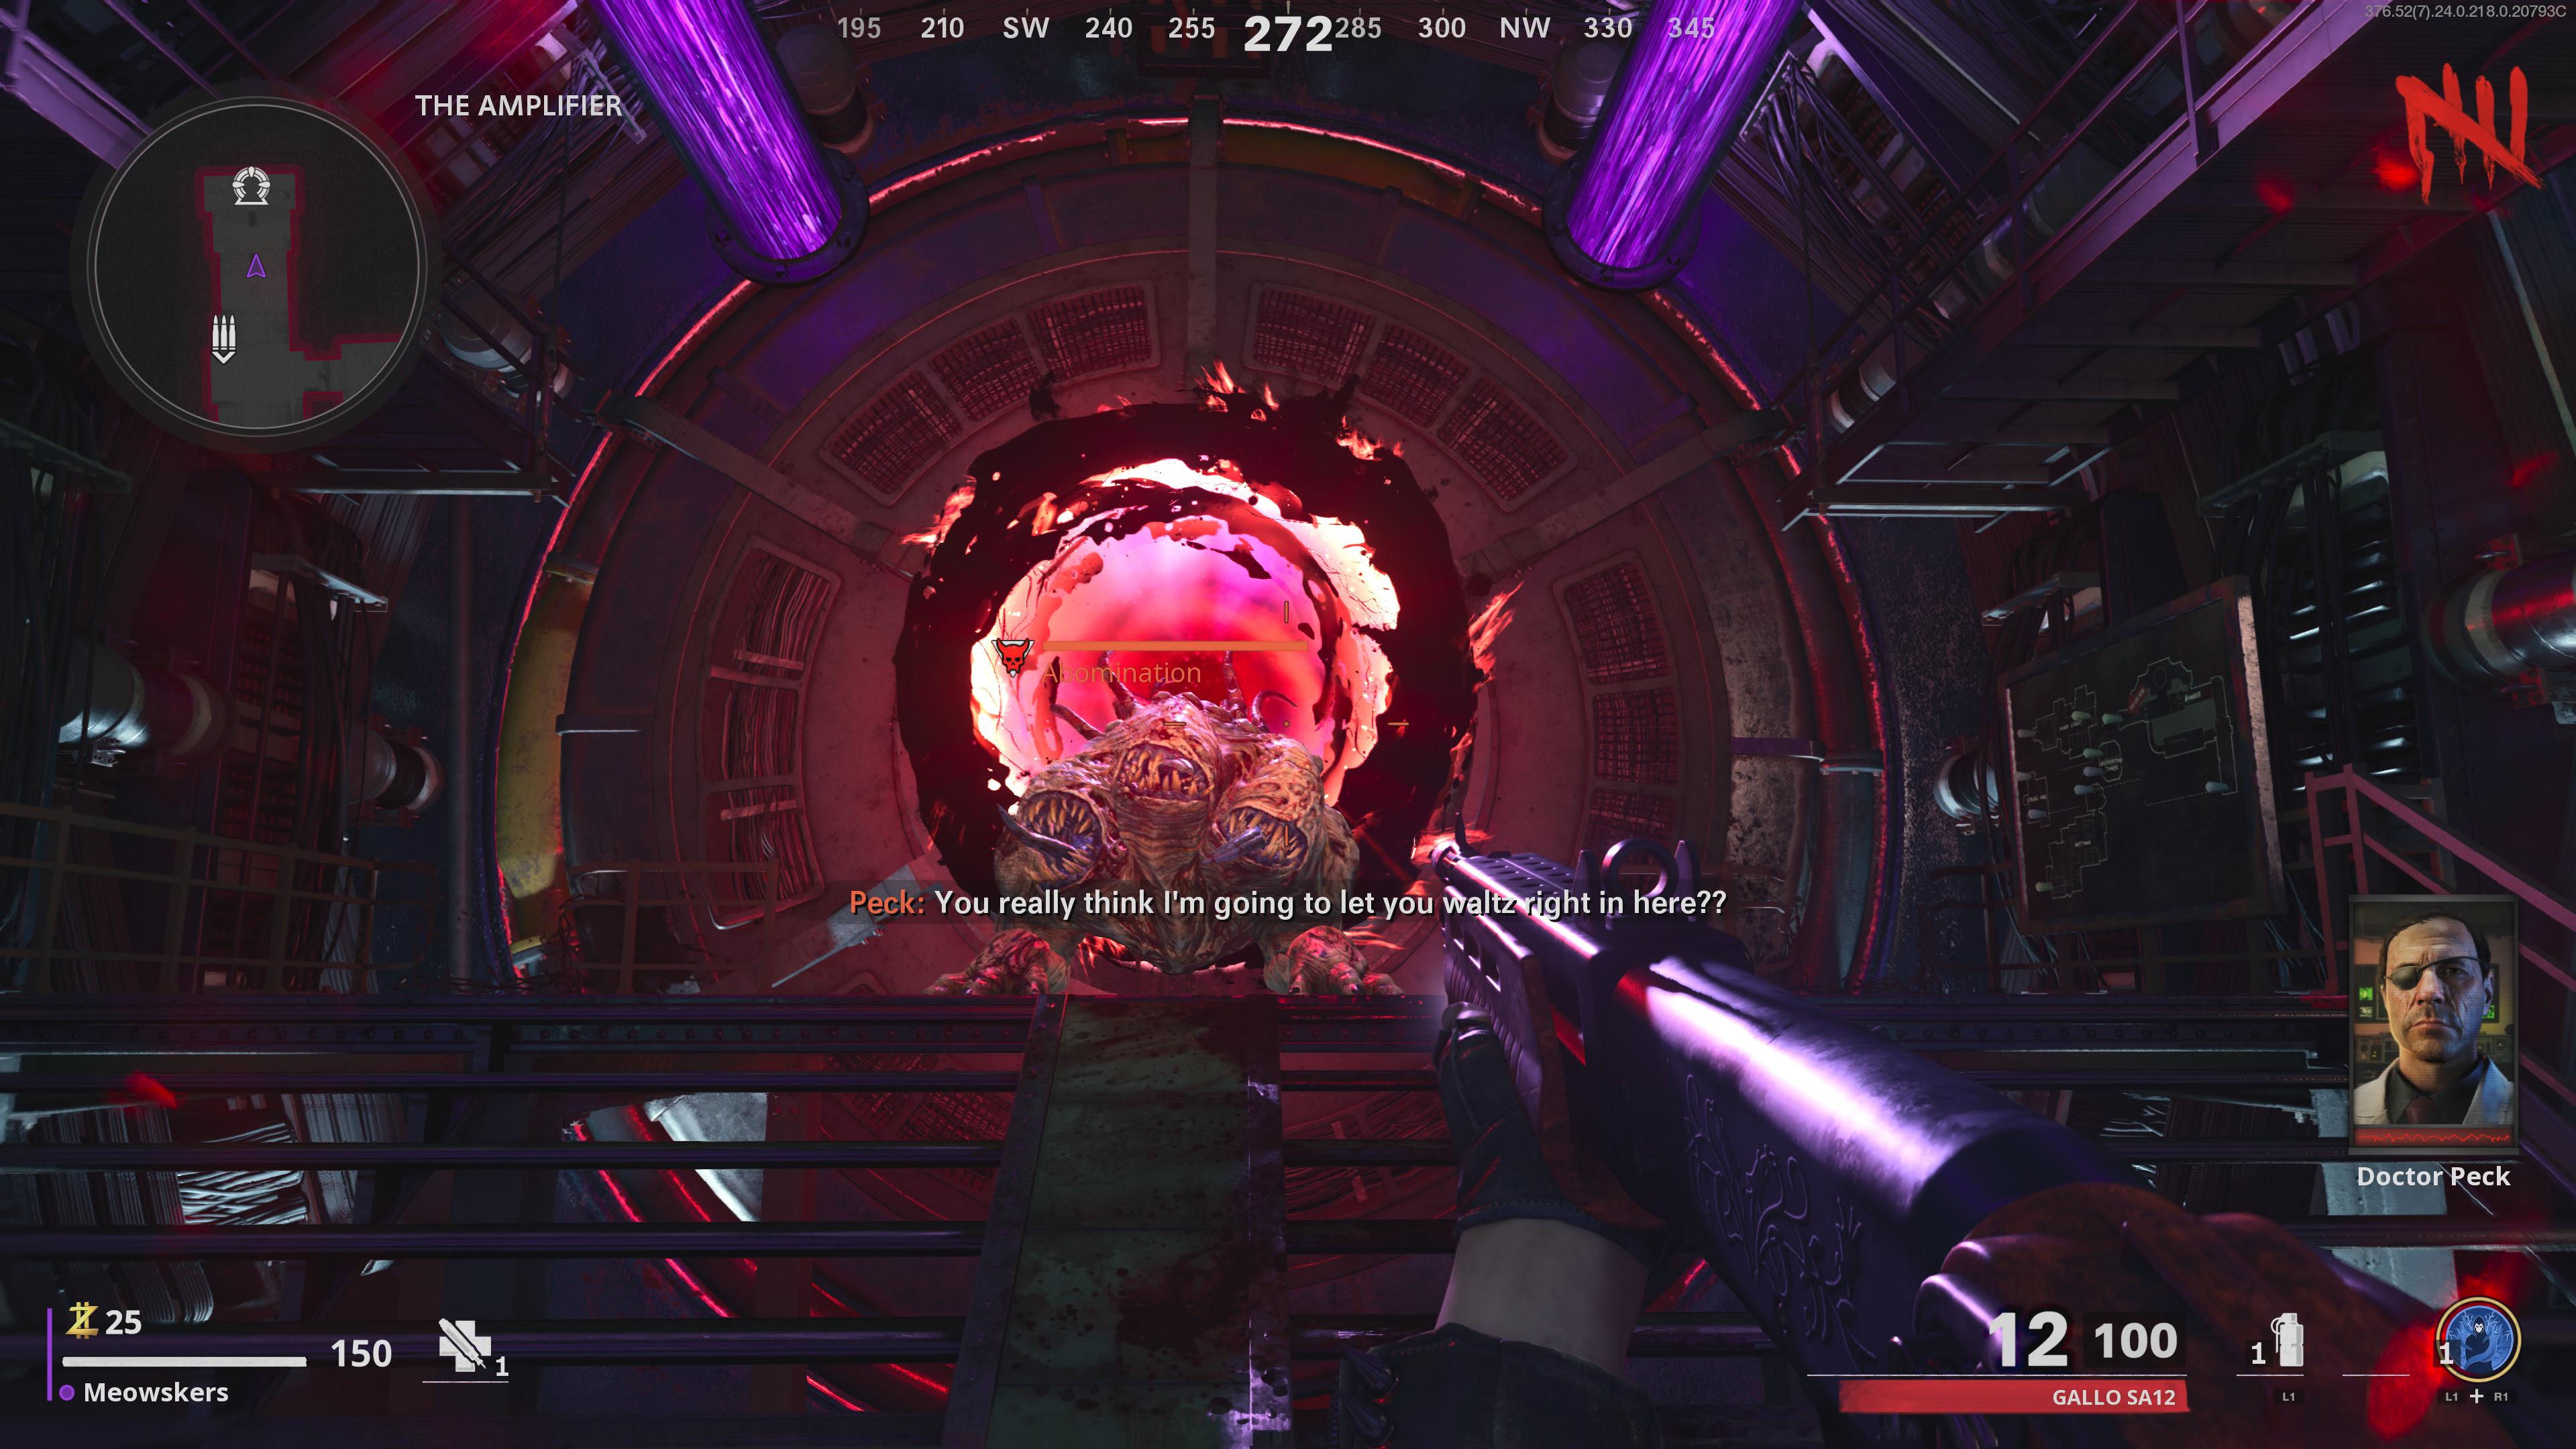
Follow the objectives to the next teleporter in the Amplifier and interact with it. This will engender an Abomination enemy, soh take advantage of its weak points to eliminate IT with rest. Enter the teleporter and you'll reach the Observation Tower.
Again, follow the marker to the red button, press it, and the Ingroup-a-Punch machine will actuate. This will also lift the lockdown in situ. While still in the Lookout station, make your way to the southern corner where you'll find another red-faced button.
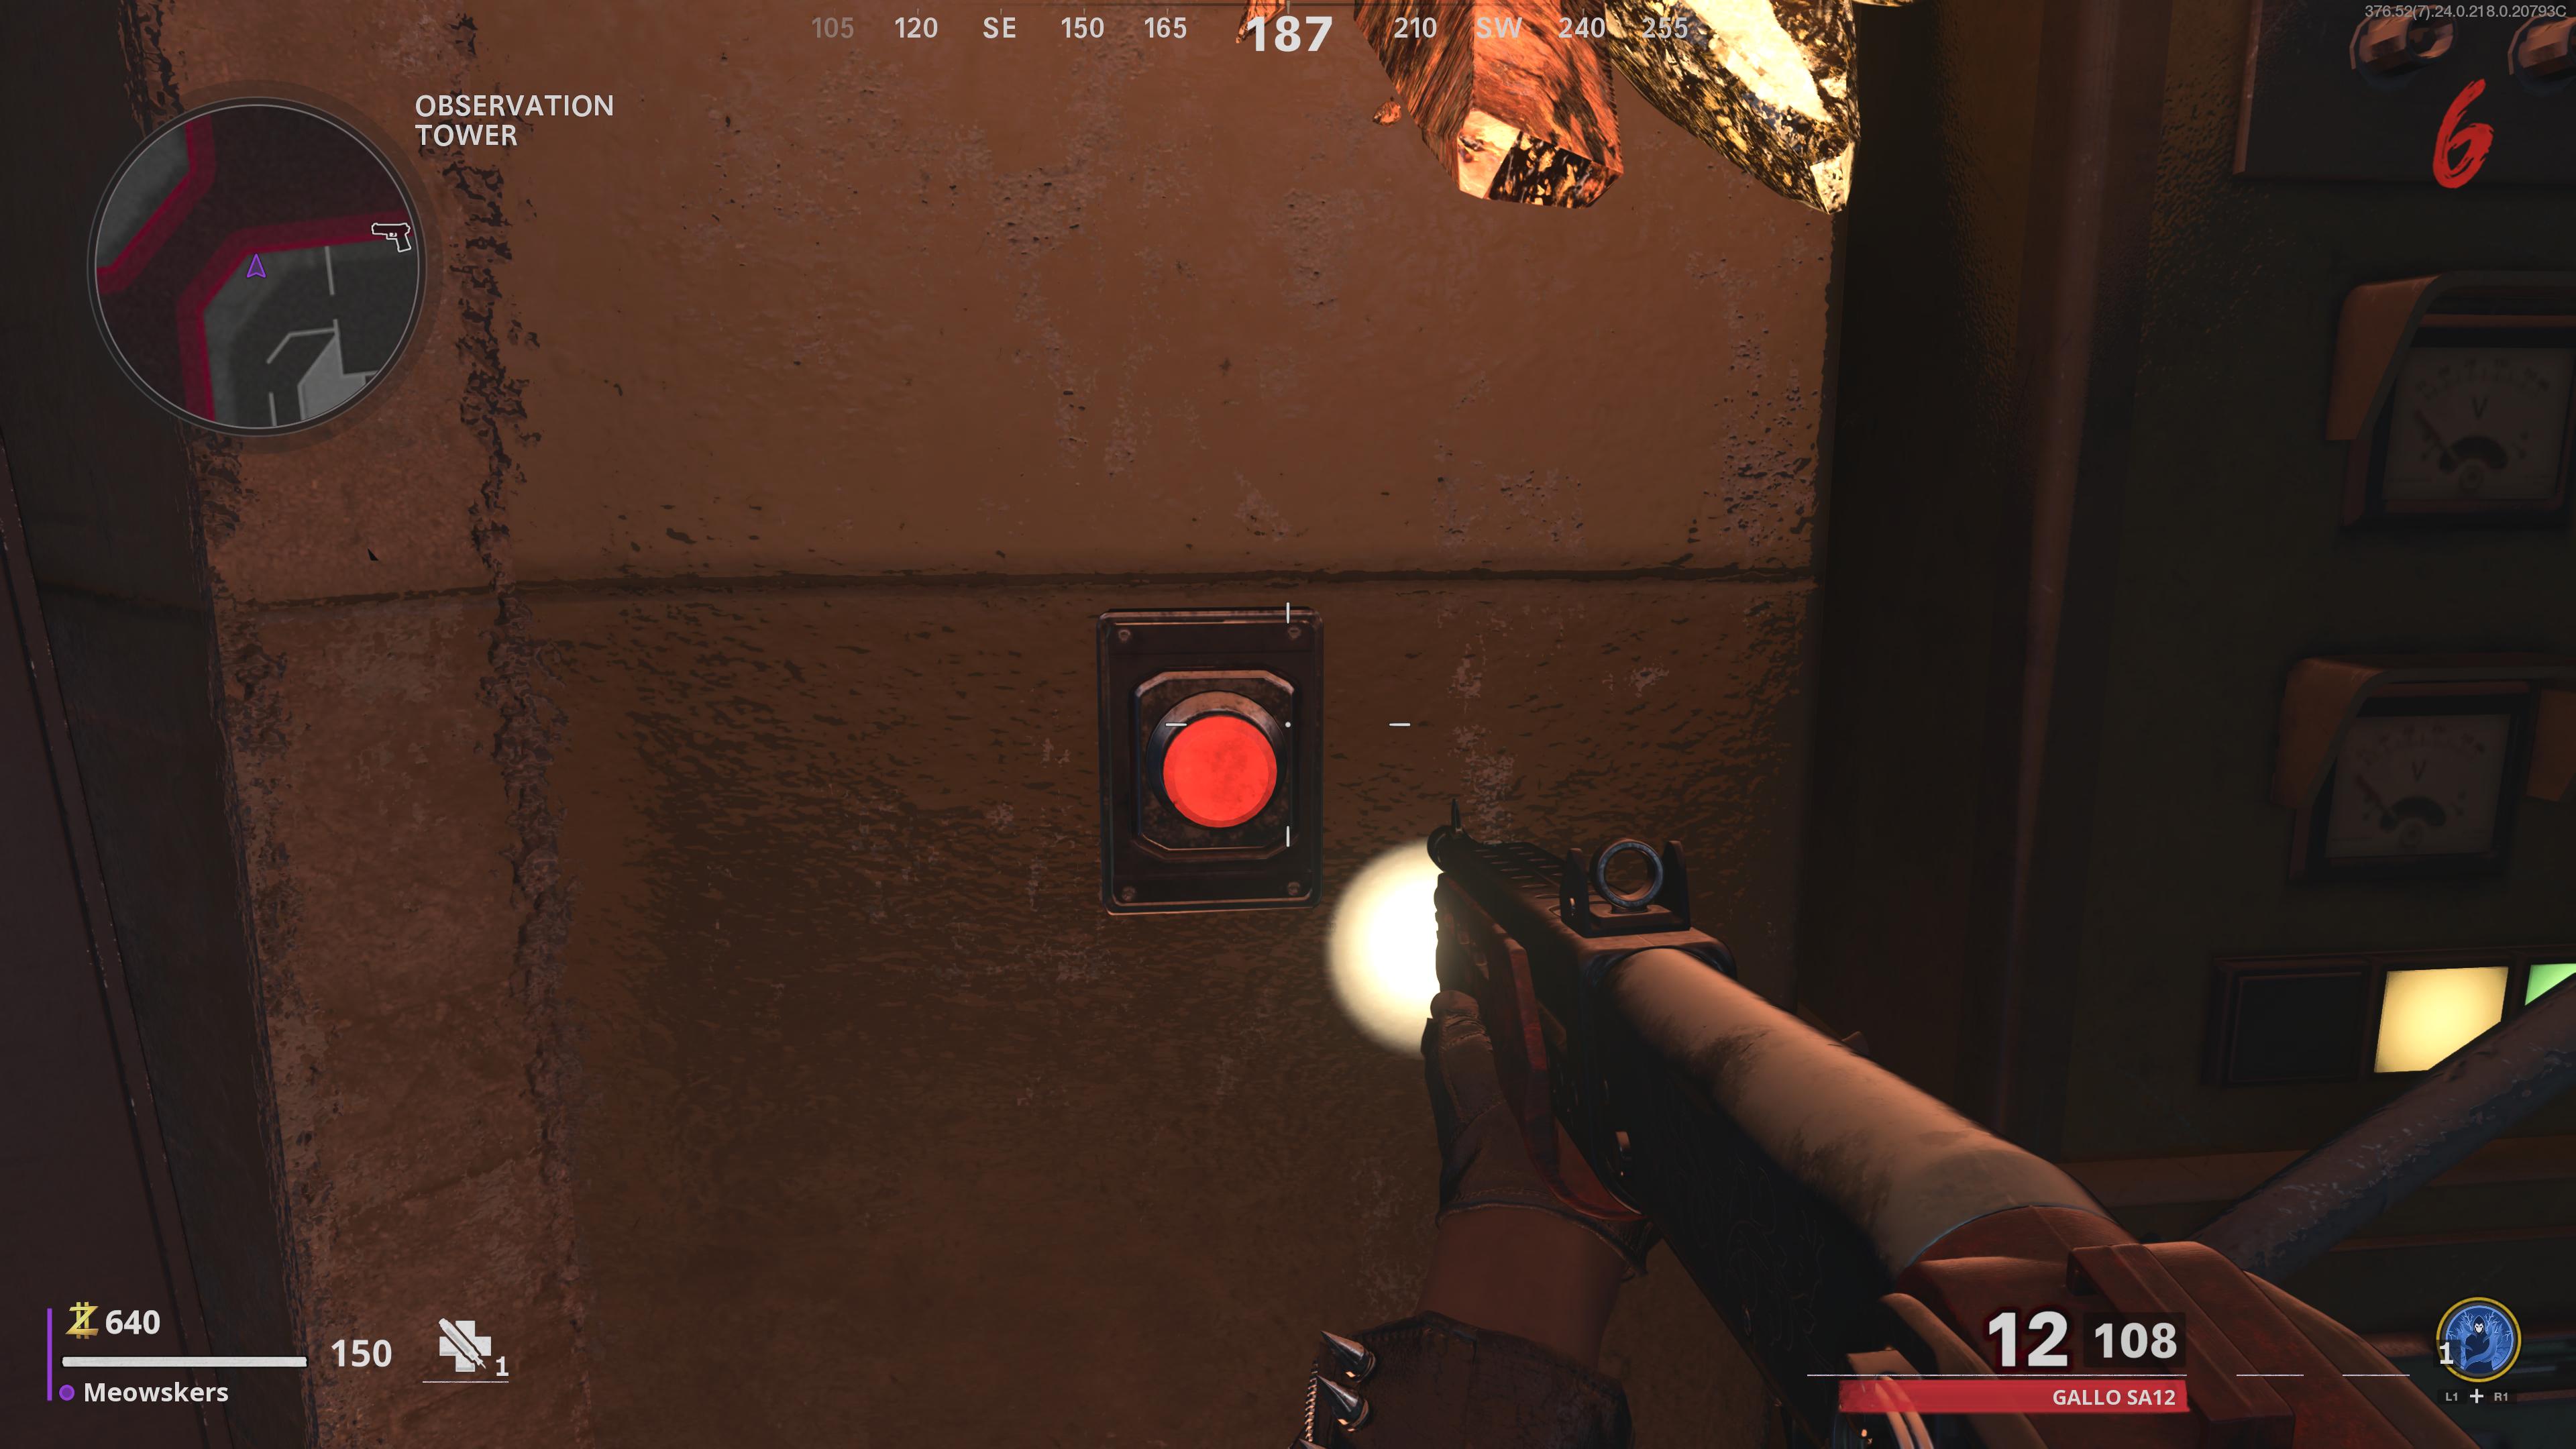
The button is to the right of four vertical windows, to the south of the teleporter. This button is unmarked, merely you'll need to press IT anyway. Doing so bequeath trigger a cutscene.
Step 4: Commence working towards acquiring the Chrysalax
Later the cutscene, you'll spawn back in, where you should start on the job on acquiring the Chrysalax, which is the Marvel Weapon of this map. It not only serves atomic number 3 a melee arm, but can too exist fired like a torpedo, making information technology versatile.
There are treble ways to acquire the Chrysalax, which we'll list below:
- Chrysalax Bay - This is the quest that is specifically tied to building the Chrysalax, which is common across all Zombies map
- Mystery Box - The Crysalax actually has a communal spawn rate, so it's not a bad theme to give this a seek
- Trials - Earn a Known reward from the Trials Machine in the Reflection Tower
- Der Eisendrache colonnade machine - Visit this gamey in the Colonnade and exist for enough rounds to earn the Chrysalax from a gold chest
Whichever method acting you use doesn't matter, as long as you get your work force happening the Chrysalax. Considering the methods of earning this Wonder Weapon hind end be time consuming, it's a good idea to pop temporary towards the future step meanwhile.
Step 5: Collect three parts to physical body Neutralizer
You can mould on step 5 while trying to earn the Chrysalax, and it's advisable to do so. For the next whole step, you motivation to collect three parts to build the Neutralizer, so let's honkytonk into their locations below. Keep in mind, you can collect them in whatsoever ordinate.
Fuel Tank
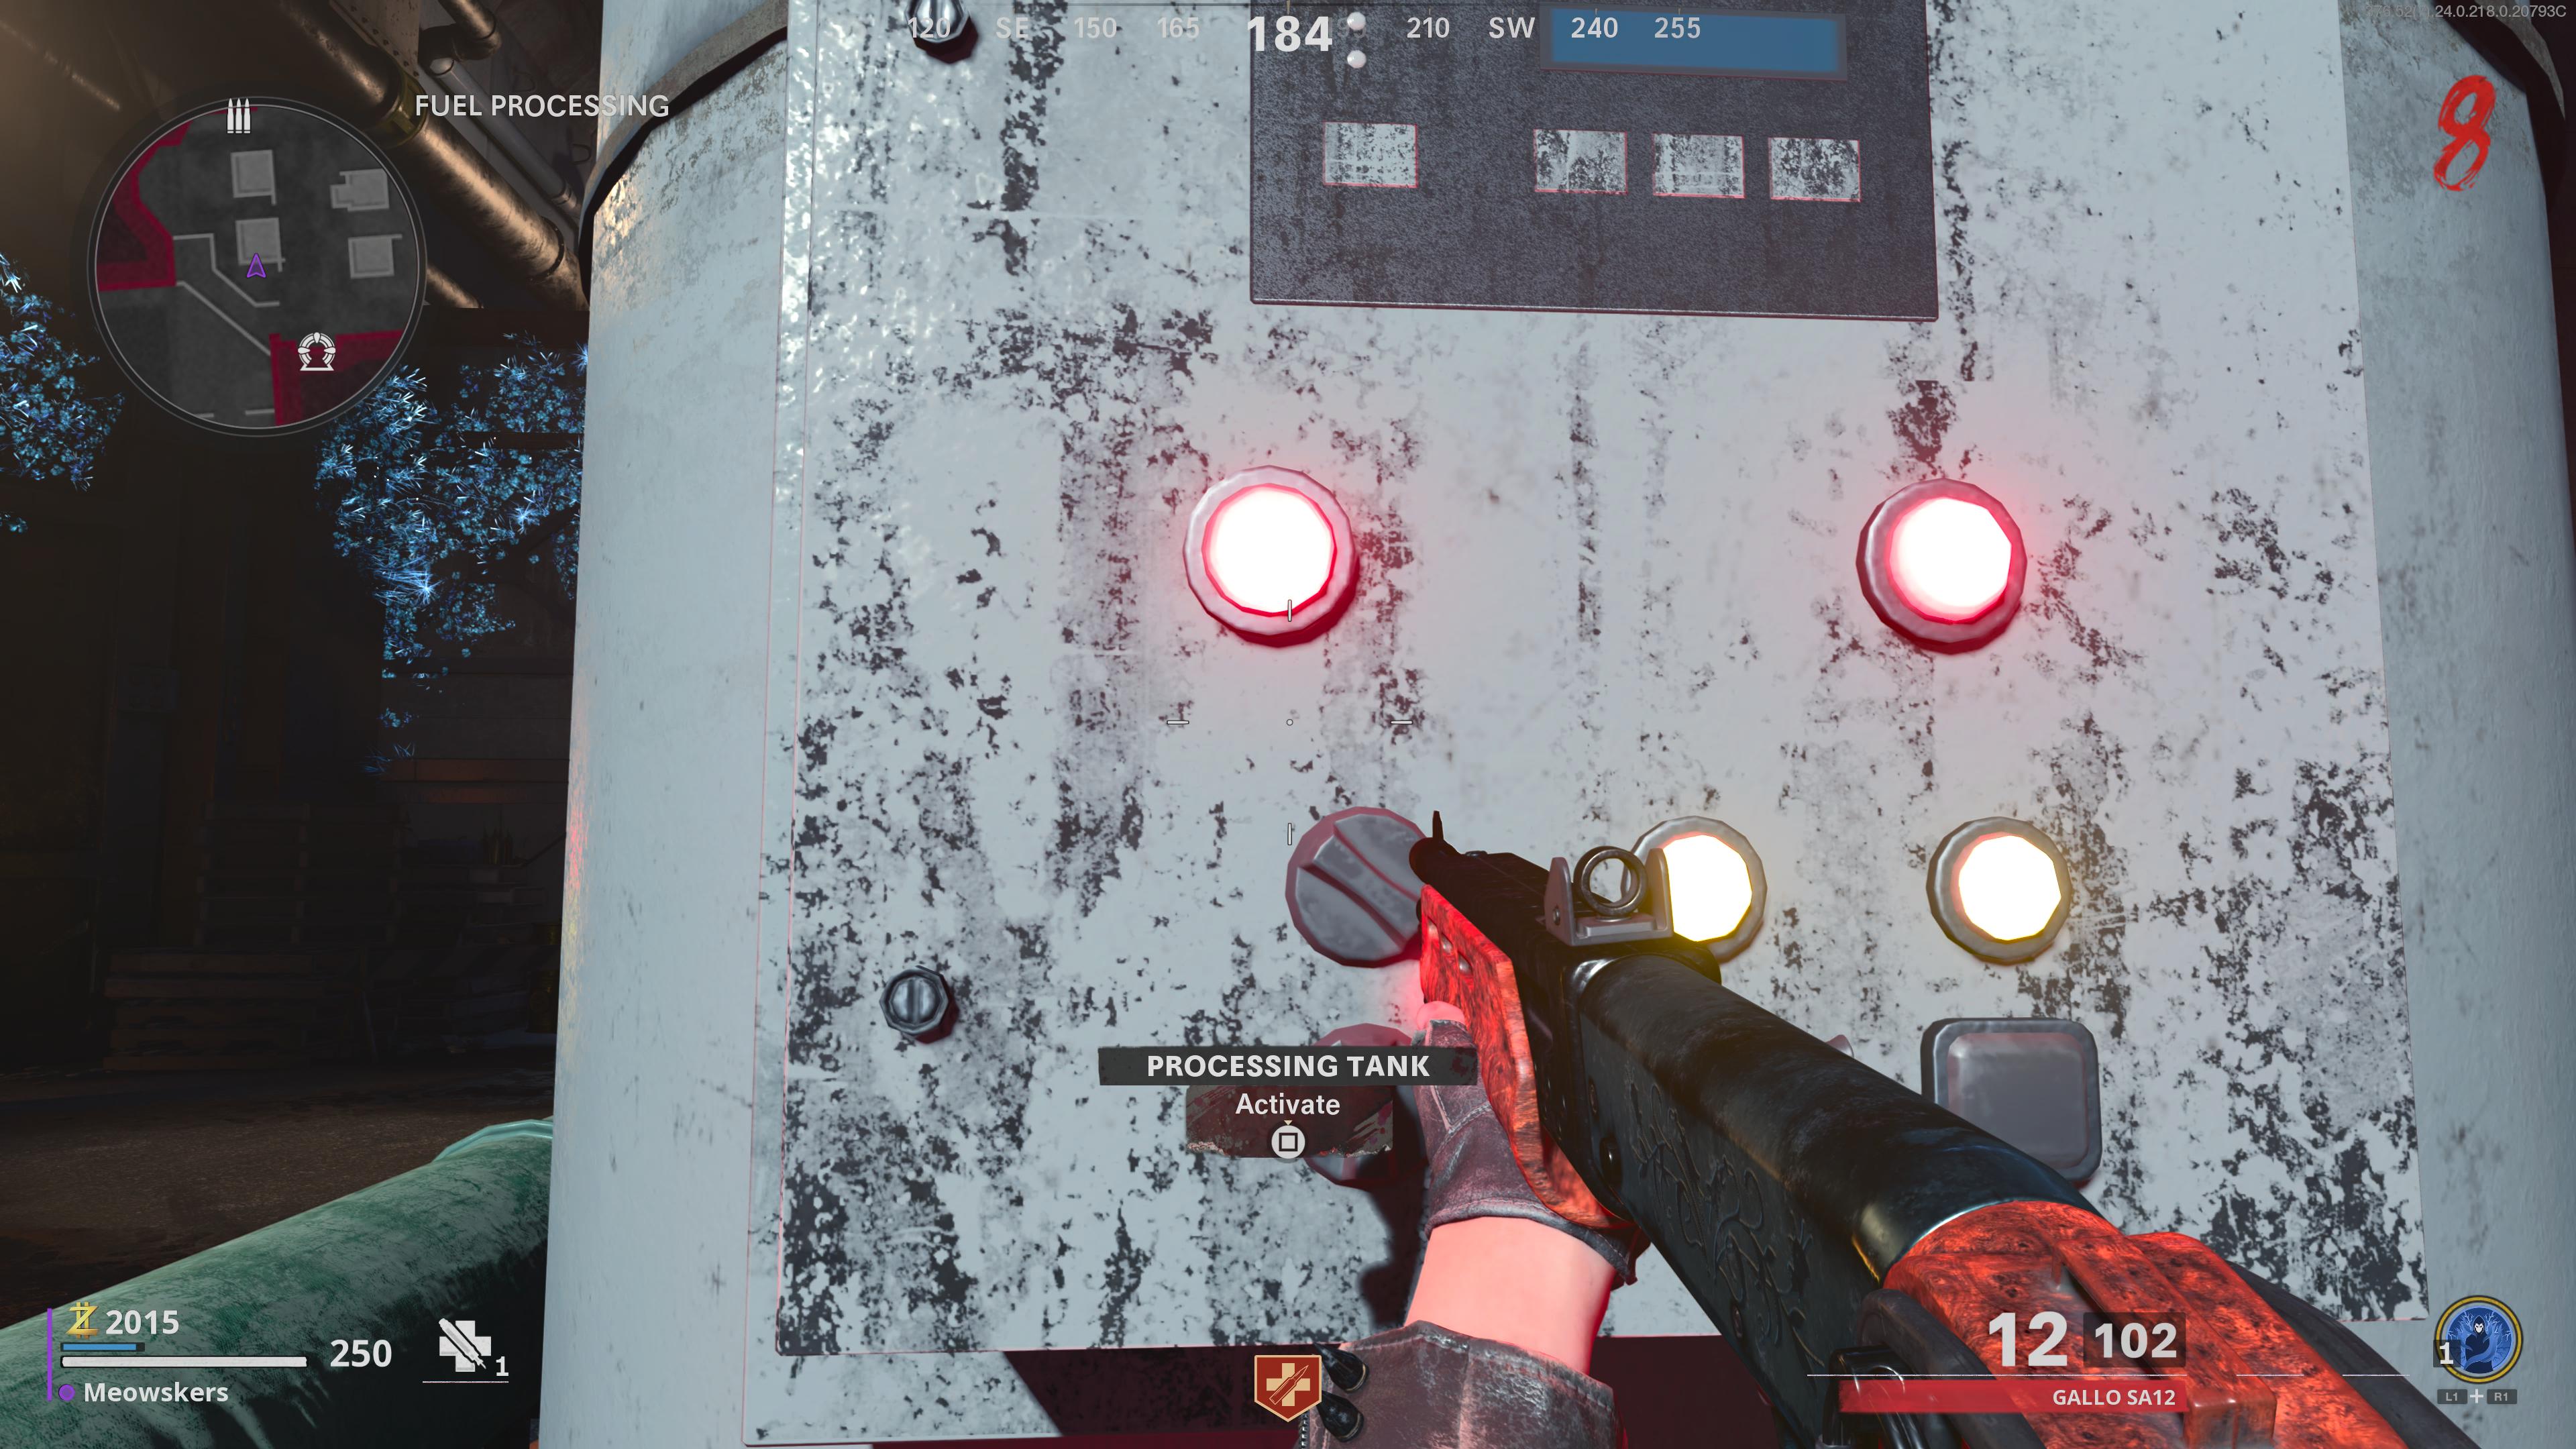
At this point, make your way to the teleporter in the Sand trap Entranceway orbit, and you'll spawn in the Fuel Processing area. Here, you need to activate one of the large processing tanks. If you're playing with a team, you all need to activate the tanks at the same time (there are sextuple of them). Alone players retributive demand to interact with one.
This will trigger a lockdown that requires you to buy food zombies to fill up the tanks. After you've killed sufficiency zombies to fill the tanks, the lockdown leave end, and the Fire Tank will spawn in the center of this area.
Trapping Unit
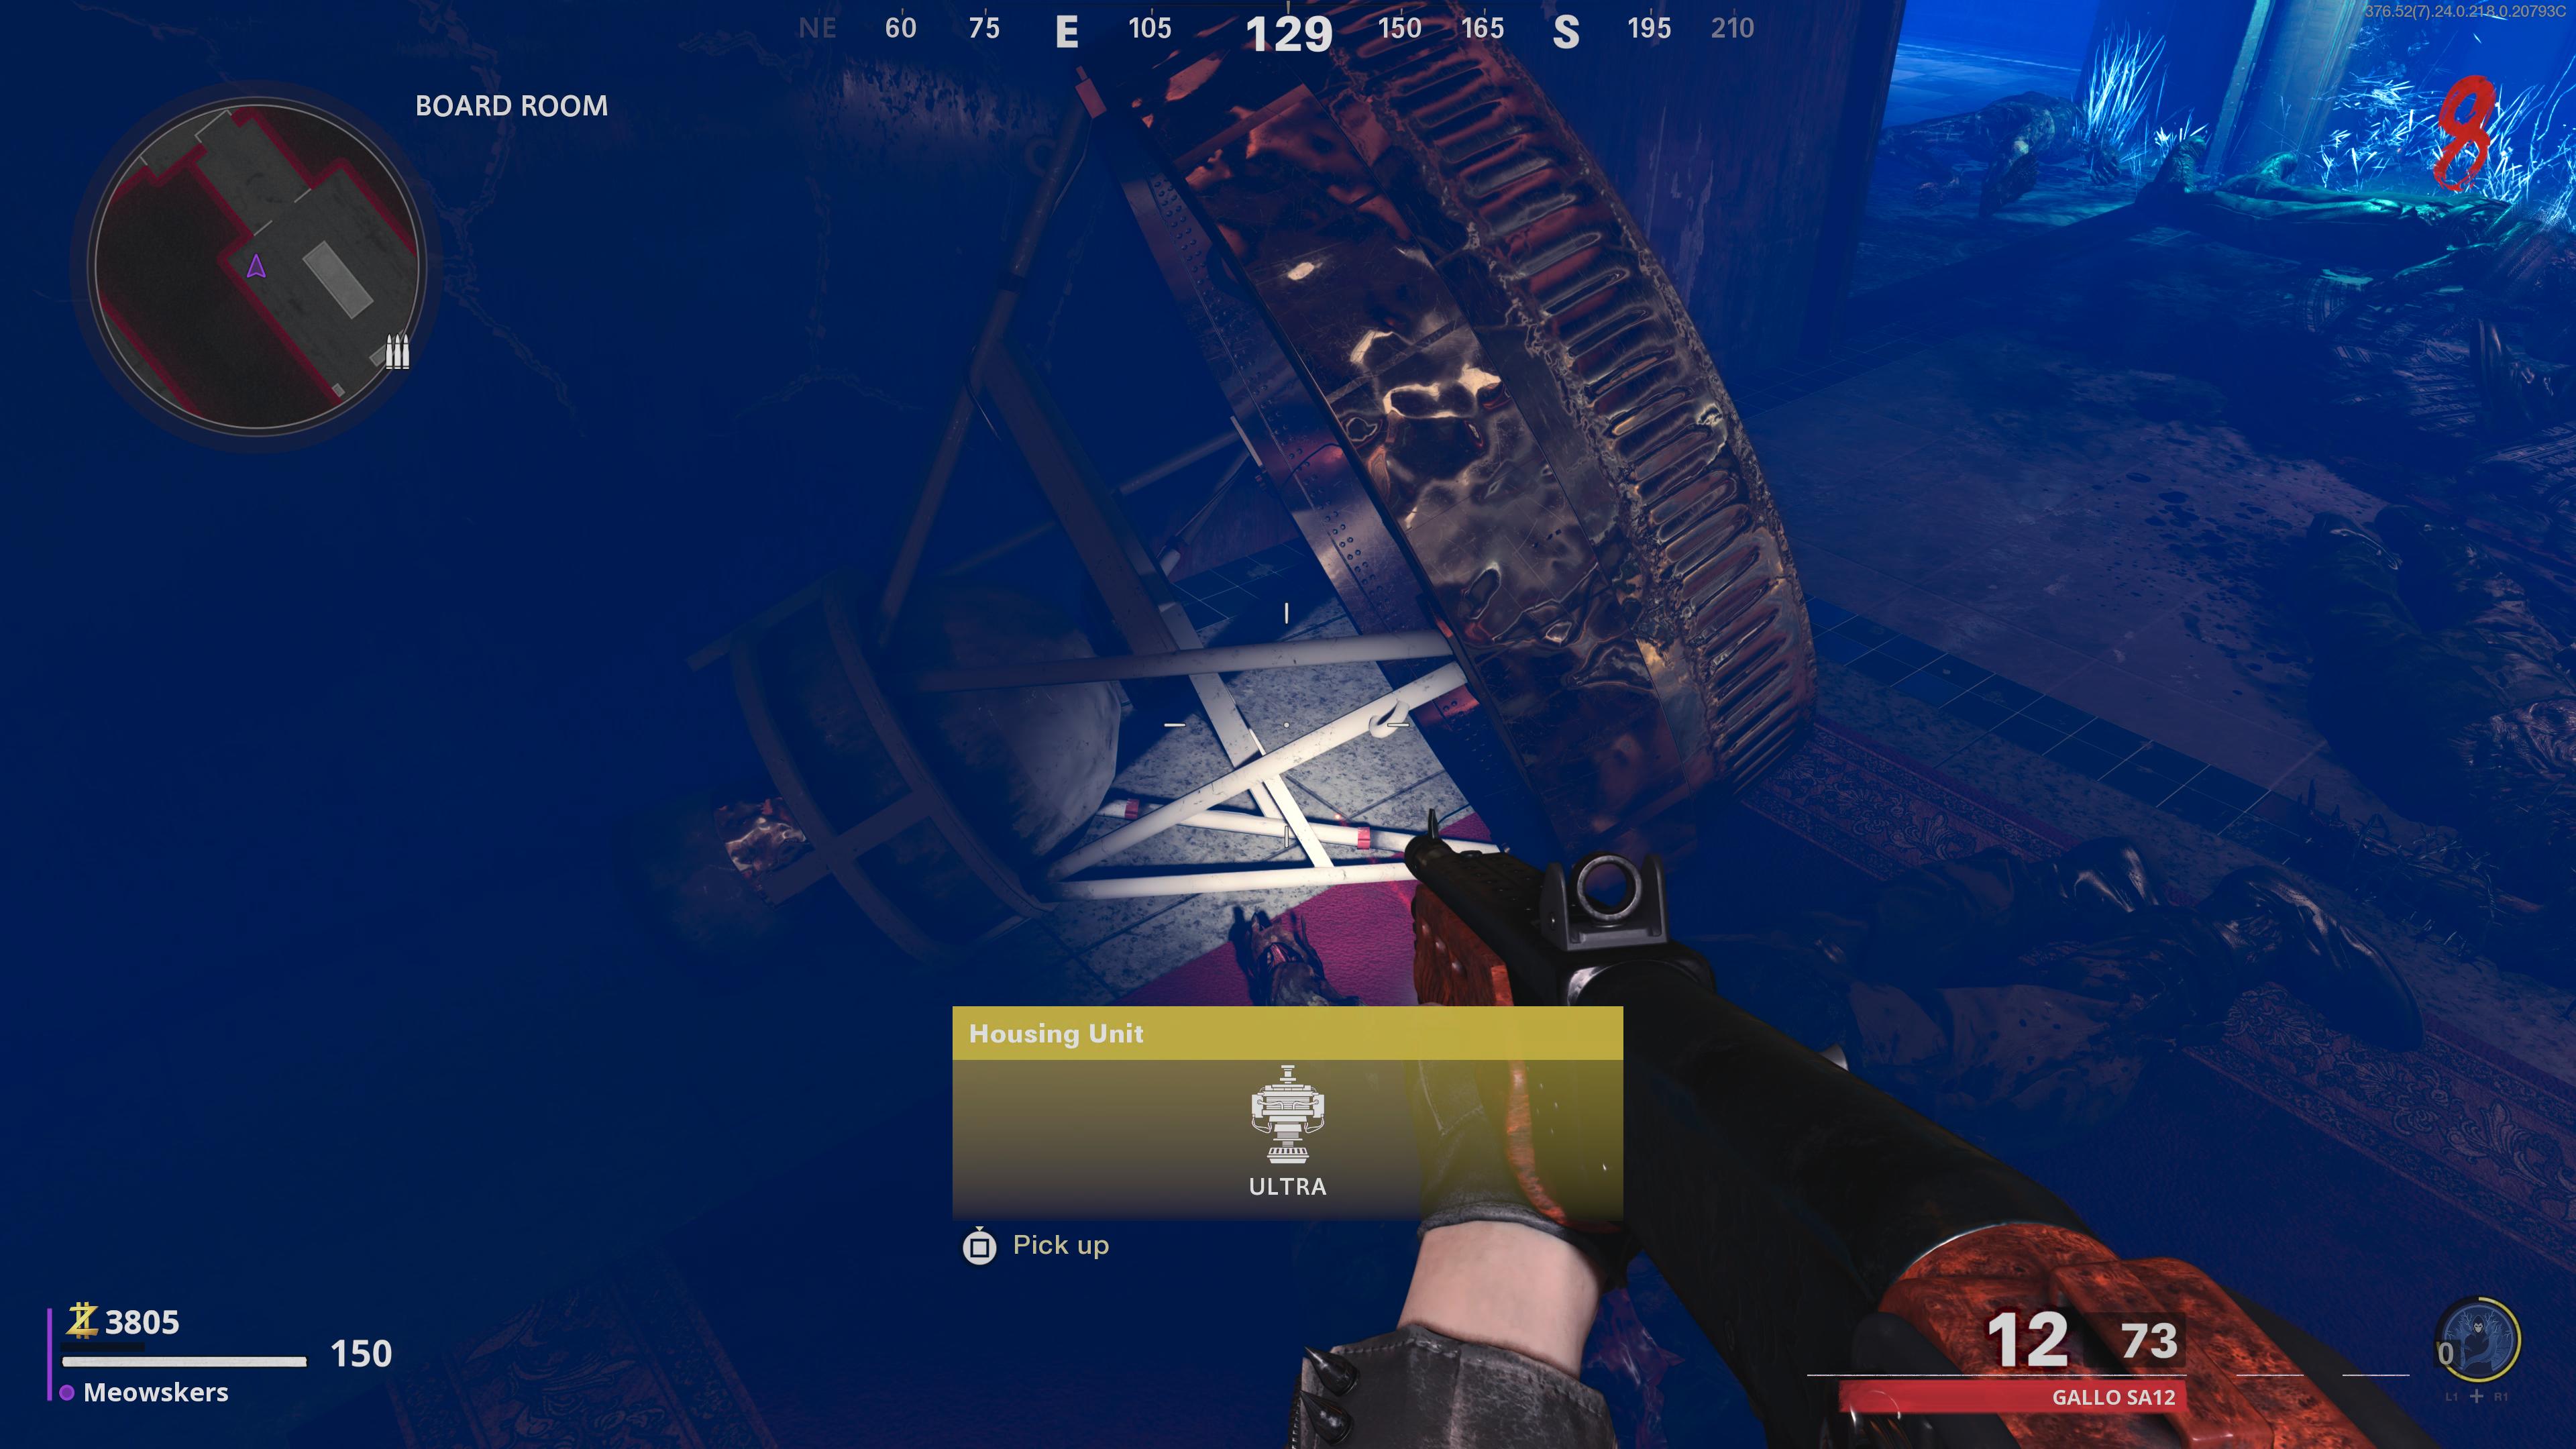
Incoming, you'll wishing to hold back acting until an Abomination spawns. At one time this happens, lead it to the Gameboard Room of the bunker and on the northeasterly side in the upper corner, you'll find a Housing Unit, which looks comparable a big prize.
You can't interact with IT, so instead, you should lure the Abomination to this domain and get it to knock down the Housing Unit. It helps if you stand in the quoin and draw it to attack you ahead quickly shunning. One time the Housing Social unit is knocked down, grab it and take unconscious the Abomination.
Monitoring Device
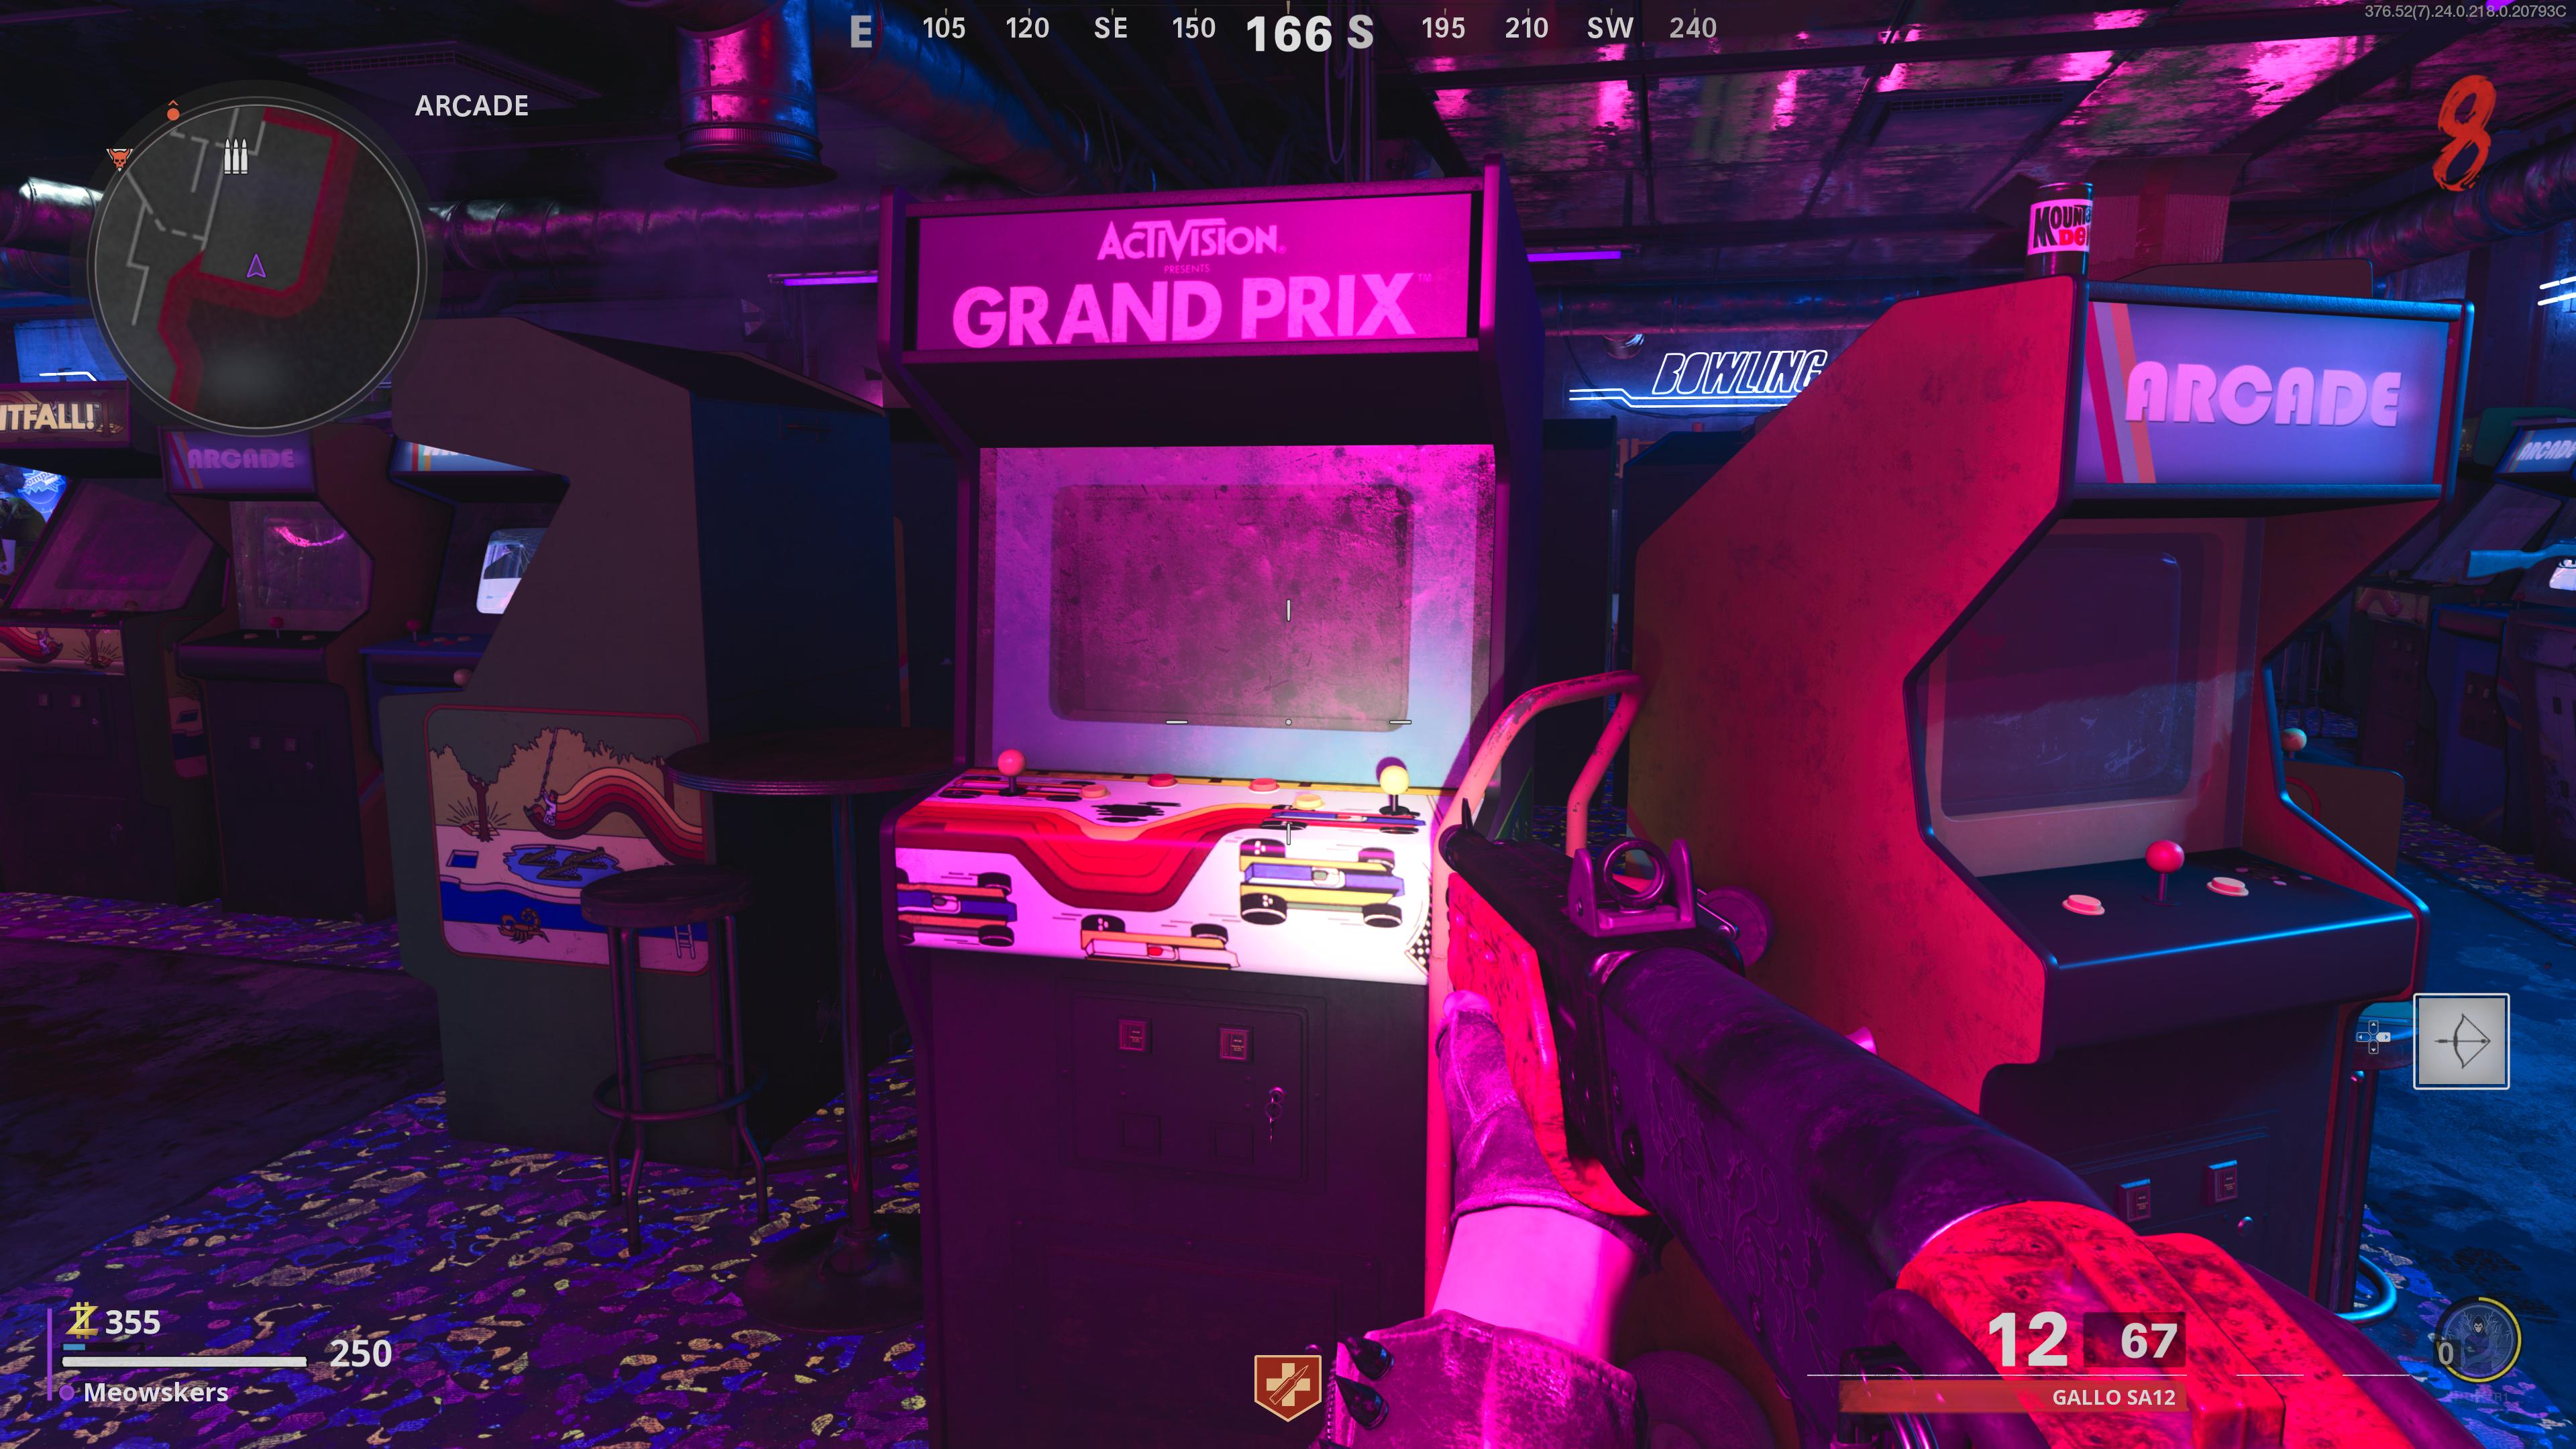
Finally, relieve oneself your way to the Pack-a-Punch machine and upgrade a authoritative weapon with Dead Wire, which costs 2,000 points. From present, lure a living dead into the Arcade and shock information technology with Dead Wire right next to the Activision Grand Prix arcade political machine. If done correctly, it will enable the automobile, allowing you to deploy an RC-XD for 2,000 points.
Deploy the RC-XD and drive it into the TV store, behind the negative, where you'll find a vent. The RC's DOE bequeath uncover a vent, so hold out through it, and play to the north where you'll see a shelf. Role the RC to detonate right next to the shelf to knock it over. Then once you gain control of your graphic symbol again, running play to the TV store to the right of the counter and you'll see a hole in the wall with the Monitor. Grab IT.
At this point, you'll want to ensure you have the Chrysalax, thus if you Don River't, now's a blast to prioritize grabbing it since you need it for the next stride.
Step 6: Gather three Catalyzed Vitreous silica Shards
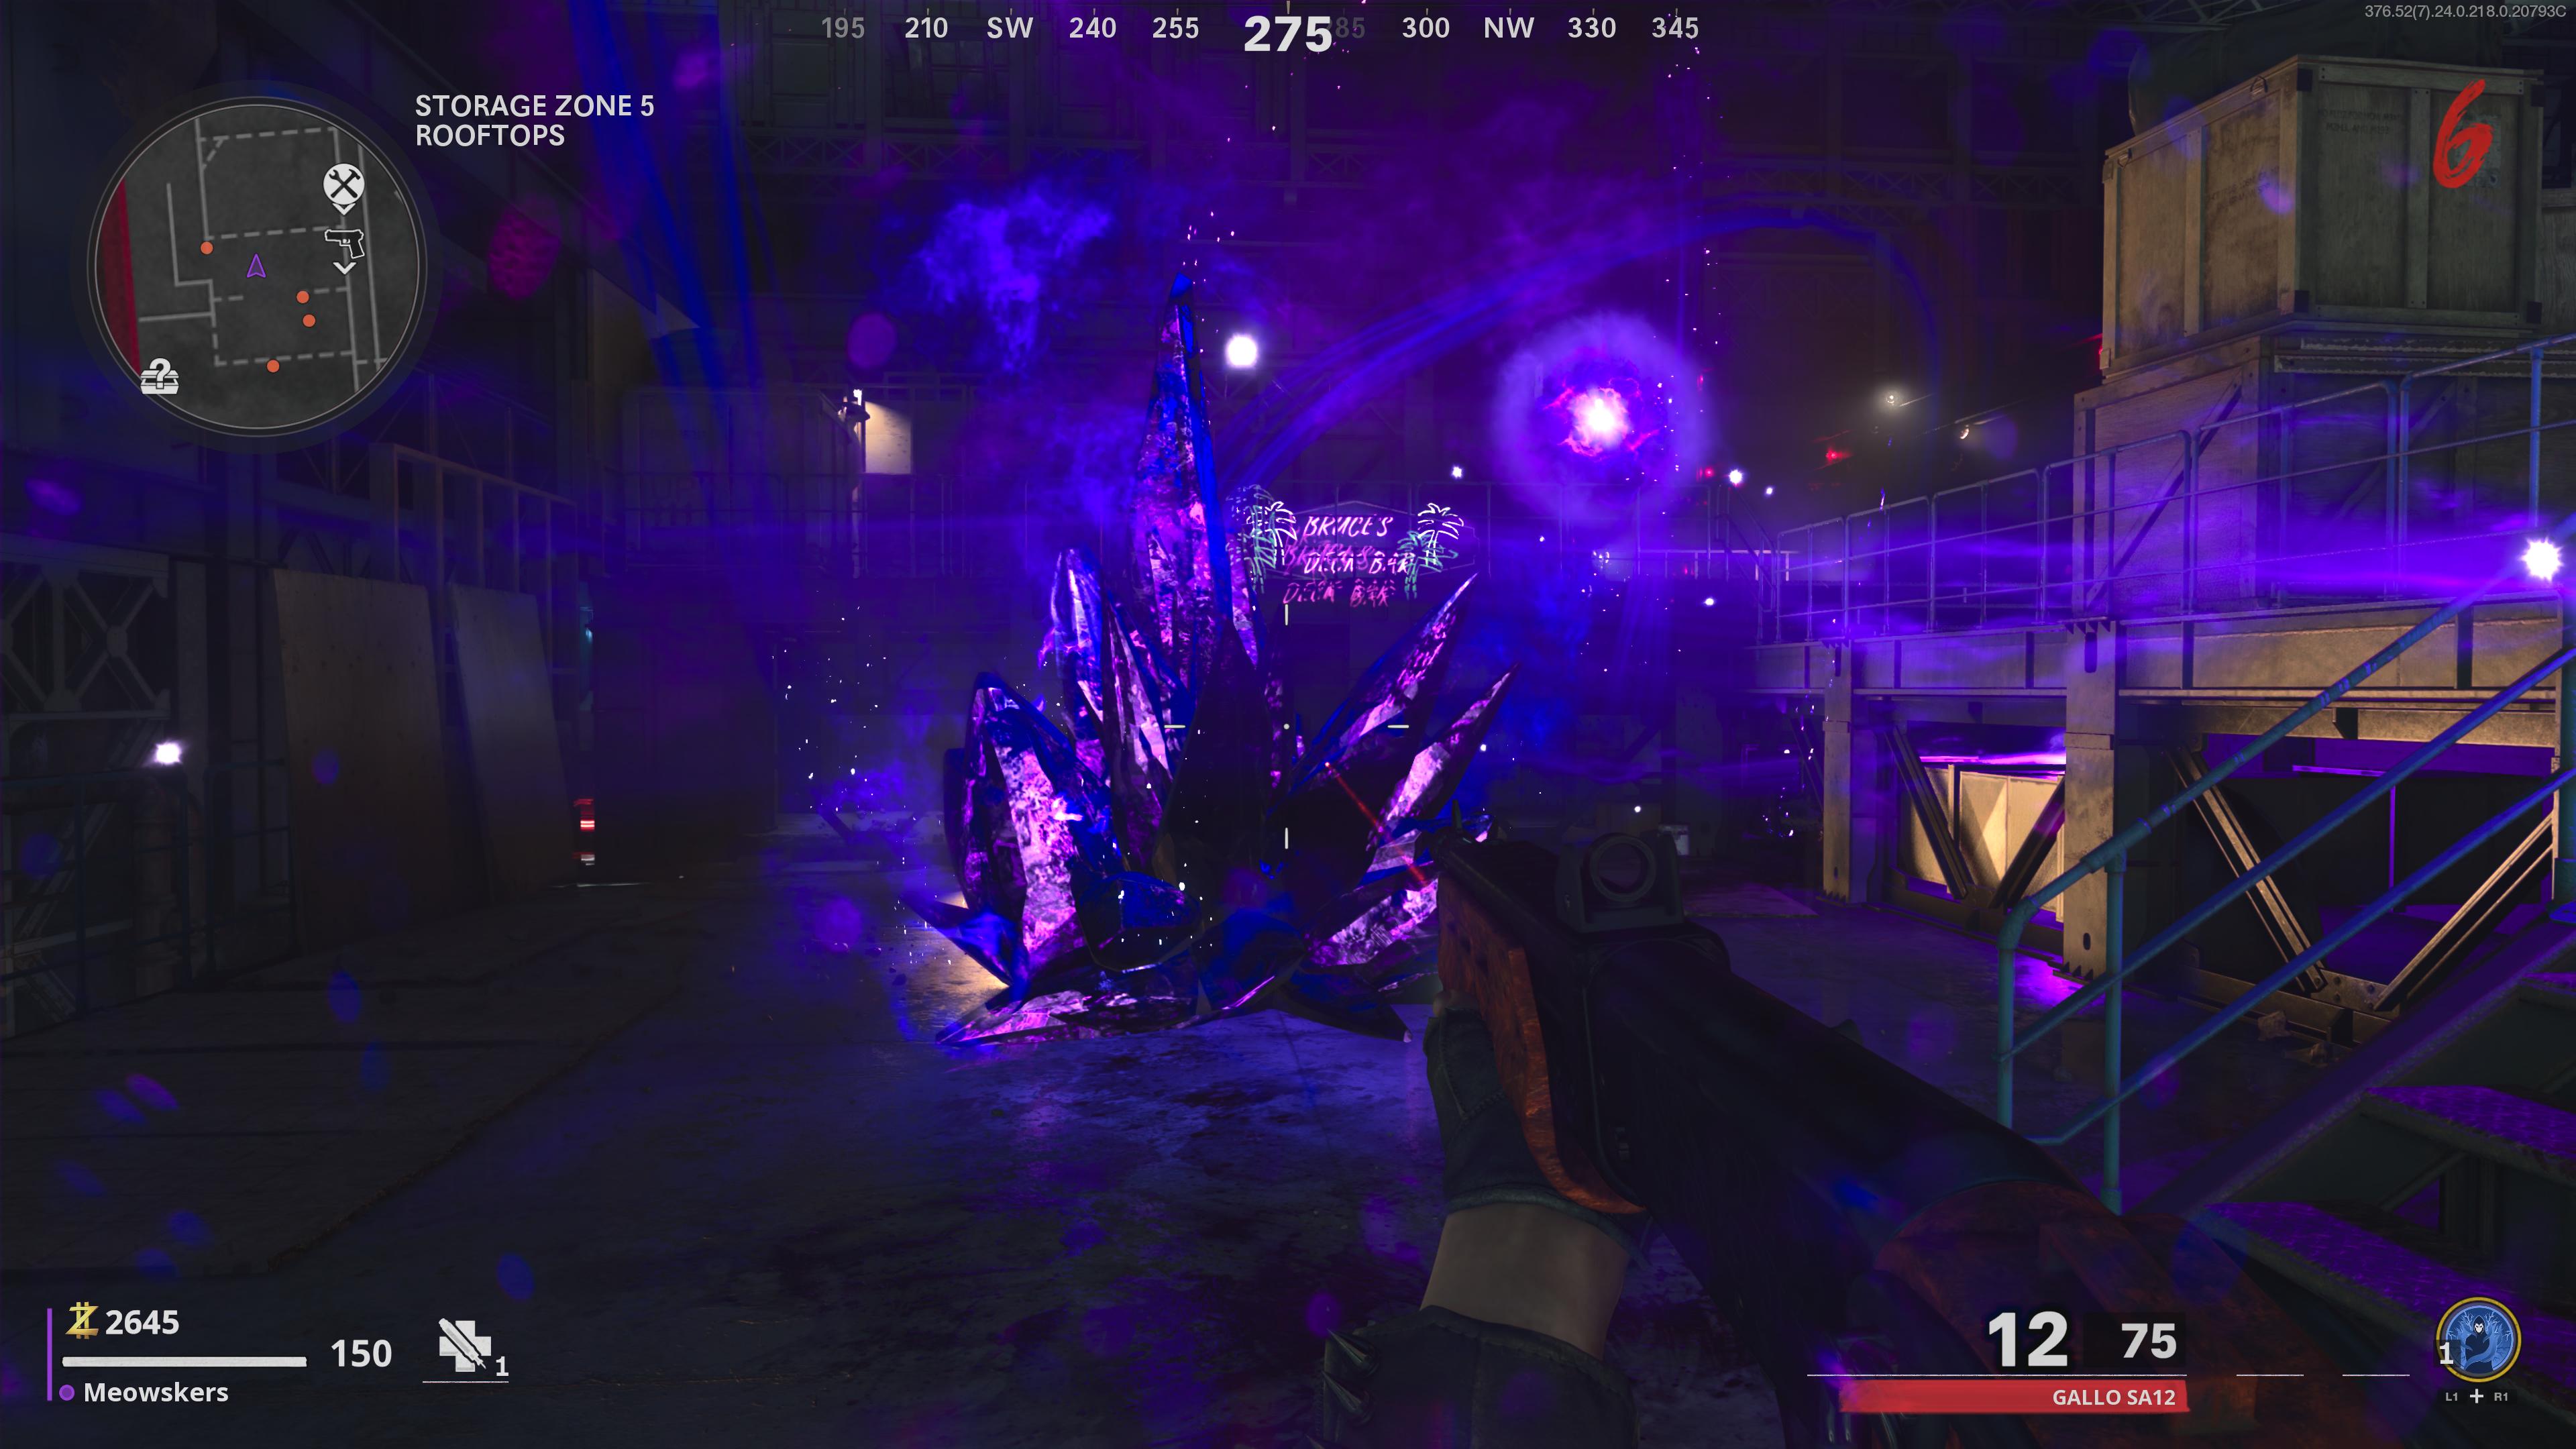
You've got one more set of items to gather up, but doing so is easier said than done. There are three purple Catalyzed Crystals around the map, merely luckily, they breed in fixed locations. We'll list them below:
- Amplifier
- Starting Sphere
- Storage Zone 5 on rooftop
You demand to destroy the three drifting orbs that fly around the Crystals, which is done by using the gun version of the Chrysalax. Press ascending on the D-pad to switch to the gun version of the axe and then shoot the three orbs. Once they go down, you'll be able to destroy the huge Crystal with the ax version of the Chrysalax to reveal a Crystal Shard.
Pick aweigh the Shard and then throw IT into an Abomination's mouth. One will typically spawn after you've destroyed the Catalyzed Quartz. If done correctly, the creature's tail will light up orange, indicating it worked, so then you pauperism to eliminate the savage. Once you do, it'll drop a Catalyzed Watch crystal Shard. Nowadays, repeat this outgrowth at the other two locations to collect three Catalyzed Crystal Shards.
After you grab the third ace, you'll and then be able to craft the Neutralizer.
Step 7: Escort Neutralizer
At this point, channelise to the Main Street area and make your room to the Workbench to craft the Neutralizer. Activate it, and you'll enrol an date phase that can be untrusty if you aren't prepared. In one case the phase begins, a large babble volition appear around the Neutralizer and you need to stop within information technology to get the device to movement.
Periodically, IT will bolt out of fire, and so information technology's up to you to smash the orange Crystals on the street to collect more. Stick the Catalyzed Crystals to refuel the device until it reaches its finish.
This is the point of no return, so make a point everything is upgraded as much as possible - particularly the Chrysalax - to ensure you're prepared. The Neutralizer will stopover in front line of a bombastic room access and testament spawn a perk machine, Pack-a-Punch automobile, and new devices that will help you get make for the fight.
When you're set, approach the bear-sized doorway and interact with information technology to start the contend against the Forsaken boss.
Step 8: Forsaken boss fight
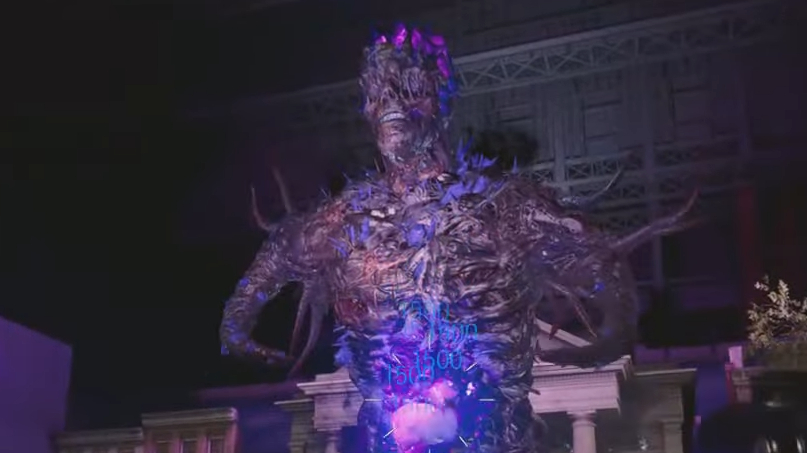
This is one of the more aboveboard gaffer fights in Cold War Zombies, which is a relief since they'Ra ordinarily complicated. We advise running complete to the Ring of Fire beneath Maxis to fill out the perfume level by killing zombies within the ring. You'll card an essence time connected the left side of the sort. Doing thus will activate one of the laser cannons on the side of meat of the field of battle. Then, repeat the process happening the opposite side to activate the indorse laser cannon.
From present, start shooting the Forsaken's armored shoulder pads with the gunman version of the Chrysalax and after you've damaged some of them, you'll take down its shields, while also revealing the weak points. Once this happens, run down to nonpareil of the laser cannons and use IT to shoot at the newly revealed weak point on the gaffer' shoulders. If through correctly, you'll lower the Forsaken's wellness to half.
After a cutscene, you'll essentially need to repeat the previous step, only this time, the unaccented power point will be at its stick out. Remember, licking zombies inside the Ringing of Fire beneath Maxis to turn on the cannons, then use the Chrysalax to dash the armour to deplete it before victimisation the laser cannons to damage the asthenic point.
This brave follows the rule of three - so repeat the serve one next-to-last time, but this time the head will be the weak office. Heap plenty damage to the head and the boss will crash and the Easter Egg will Be complete.
Black Ops Cold War best guns | Black Ops Cold War Outbreak Easter egg | Stone-cold War Mauer Der Toten Easter egg guide | Cold War Zombies Firebase Z Easter egg | Black Ops Cold State of war Zombies guide | Black Ops Ice-cold War Zombies Easter Egg walkthrough | The best guns in Unconscious State of war Zombies | How to advance DIE Shockwave in Cold Warfare Zombies | Firebase Z Wonder Weapon

Joseph loves Nintendo and horror games. With the Nintendo Switch, he's ready to get spooky anytime, anyplace. He specializes in covering Song of Duty: Warzone and fulfi RPGs like Dark Souls, so you can bet he's looking forward to Elden Ring, the inspiration of George RR Martin and Hidetaka Miyazaki. You can find Joseph's work at GamesRadar, Digital Trends, Inverse, and Child's play Magazine. When he's not piece of writing about TV games he can usually be found petting his cats and hearing to some Progressive Bronze. Atomic number 2 thinks Meshuggah is tight.

Source: https://www.gamesradar.com/black-ops-cold-war-forsaken-easter-egg-guide/
Posted by: heckmanagens1995.blogspot.com
0 Response to "Black Ops Cold War Forsaken Easter Egg guide - heckmanagens1995"
Post a Comment